Showing posts with label Qt. Show all posts

Monday, September 2, 2013

[Qt] Custom QListView delegate with word wrap

Using QListView with a custom item layout has been a very popular demand by many developers. The problem with using  a custom delegate was having some basic features like word wrap depending on the allowed list size.

Here is a screenshot from a project prototype I've been working on. The text will wrap around to fit in multiple lines depending on text length and list view width.


My custom delegate is about using two important methods: QFontMetrics::boundingRect() and QPainter::drawText() .

The first method will return the minimum Rect needed to draw the given text using the given origin and font. The second method draws the given text within the given Rect. Note that the flag Qt::TextWordWrap is given to both methods when called.

The code is simple:
  • Get system default font.
  • Process the font to suite your needs. In my case: I have a normal font and another bold one for the header.
  • Create a QFontMetrics instance for each font.
  • Use the QFontMetrics instances to calculate the Rect needed to draw that text given the needed flags and option.rect.width() that indicates the allowed width inside the list view.
  • Calculate the total area needed to return it in the sizeHint() method of your list view delegate. For example: I return the total heights of the two calculated rects -header and subheader- and the item width from option.rect.width(). And I prefer to add some extra padding.
  • Almost the same calculations apply in the paint() method of the list view delegate. Then the calculations are used in drawText().
Here is my ListVewDelegate class. It is a basic class with a basic drawing for header and subheader text. I left a space for drawing an icon. I also made a simple highlighting that needs more improvement and styling.

======
[listviewdelegate.h]
#ifndef LISTVIEWDELEGATE_H
#define LISTVIEWDELEGATE_H

#include <QStyledItemDelegate>
#include <QLabel>
#include <QPainter>
#include <QApplication>

class ListViewDelegate : public QStyledItemDelegate
{
public:
    enum datarole { HeaderRole = Qt::UserRole + 100, SubheaderRole};

    ListViewDelegate();
    ~ListViewDelegate();

    void paint(QPainter *painter,
               const QStyleOptionViewItem &option,
               const QModelIndex &index) const;

    QSize sizeHint(const QStyleOptionViewItem &option,
                   const QModelIndex &index ) const;

    static QSize iconSize;
    static int padding;
};

#endif // LISTVIEWDELEGATE_H

======
[listviewdelegate.cpp]
#include "listviewdelegate.h"

QSize ListViewDelegate::iconSize = QSize(60, 60);
int ListViewDelegate::padding = 5;

ListViewDelegate::ListViewDelegate()
{
}

ListViewDelegate::~ListViewDelegate()
{
}

QSize ListViewDelegate::sizeHint(const QStyleOptionViewItem &  option ,
                                        const QModelIndex & index) const
{
    if(!index.isValid())
        return QSize();

    QString headerText = index.data(HeaderRole).toString();
    QString subheaderText = index.data(SubheaderRole).toString();

    QFont headerFont = QApplication::font();
    headerFont.setBold(true);
    QFont subheaderFont = QApplication::font();
    QFontMetrics headerFm(headerFont);
    QFontMetrics subheaderFm(subheaderFont);

    /* No need for x,y here. we only need to calculate the height given the width.
     * Note that the given height is 0. That is because boundingRect() will return
     * the suitable height if the given geometry does not fit. And this is exactly
     * what we want.
     */
    QRect headerRect = headerFm.boundingRect(0, 0,
                                             option.rect.width() - iconSize.width(), 0,
                                             Qt::AlignLeft|Qt::AlignTop|Qt::TextWordWrap,
                                             headerText);
    QRect subheaderRect = subheaderFm.boundingRect(0, 0,
                                                   option.rect.width() - iconSize.width(), 0,
                                                   Qt::AlignLeft|Qt::AlignTop|Qt::TextWordWrap,
                                                   subheaderText);

    QSize size(option.rect.width(), headerRect.height() + subheaderRect.height() +  3*padding);

    /* Keep the minimum height needed in mind. */
    if(size.height()<iconSize.height())
        size.setHeight(iconSize.height());

    return size;
}

void ListViewDelegate::paint(QPainter *painter,
                                    const QStyleOptionViewItem &option,
                                    const QModelIndex &index) const
{
    if(!index.isValid())
        return;

    painter->save();

    if (option.state & QStyle::State_Selected)
        painter->fillRect(option.rect, option.palette.highlight());

    QString headerText = index.data(HeaderRole).toString();
    QString subheaderText = index.data(SubheaderRole).toString();

    QFont headerFont = QApplication::font();
    headerFont.setBold(true);
    QFont subheaderFont = QApplication::font();
    QFontMetrics headerFm(headerFont);
    QFontMetrics subheaderFm(subheaderFont);

    /*
     * The x,y coords are not (0,0) but values given by 'option'. So, calculate the
     * rects again given the x,y,w.
     * Note that the given height is 0. That is because boundingRect() will return
     * the suitable height if the given geometry does not fit. And this is exactly
     * what we want.
     */
    QRect headerRect =
            headerFm.boundingRect(option.rect.left() + iconSize.width(), option.rect.top() + padding,
                                  option.rect.width() - iconSize.width(), 0,
                                  Qt::AlignLeft|Qt::AlignTop|Qt::TextWordWrap,
                                  headerText);
    QRect subheaderRect =
            subheaderFm.boundingRect(headerRect.left(), headerRect.bottom()+padding,
                                     option.rect.width() - iconSize.width(), 0,
                                     Qt::AlignLeft|Qt::AlignTop|Qt::TextWordWrap,
                                     subheaderText);

    painter->setPen(Qt::black);

    painter->setFont(headerFont);
    painter->drawText(headerRect, Qt::AlignLeft|Qt::AlignTop|Qt::TextWordWrap, headerText);

    painter->setFont(subheaderFont);
    painter->drawText(subheaderRect, Qt::AlignLeft|Qt::AlignTop|Qt::TextWordWrap, subheaderText);

    painter->restore();
}

===========

Using it is pretty simple:

[mainwindow.cpp]
QStandardItemModel *model;  
model = new QStandardItemModel();  

ListViewDelegate *listdelegate;  
listdelegate = new ListViewDelegate(); 

ui->listView->setItemDelegate(listdelegate);  
ui->listView->setModel(model); 

QStandardItem *item = new QStandardItem();  
item->setData("Some Header",ListViewDelegate::HeaderRole);  
item->setData("Some long description text.",ListViewDelegate::SubheaderRole);  
model->appendRow(item);

Friday, April 19, 2013

Qt: Save QPainter Output in an SVG or Image File

To save what you paint in a Qt window to a file (SVG or image) is an easy and straightforward piece of code.

You create a QSvgGenerator or a QImage object.
Some initialization.
Paint into the object (treat it as an IODevice)
And  we are done.

Suppose that this is what I draw in my paint event:

void MainWindow::paintEvent(QPaintEvent *)
{
    QPainter painter;
    painter.begin(this);
    
    painter.setRenderHint(QPainter::Antialiasing);
    paint(painter);
    
    painter.end();
}

void MainWindow::paint(QPainter &painter)
{
    painter.setClipRect(QRect(0, 0, 200, 200));
    painter.setPen(Qt::NoPen);
    painter.fillRect(QRect(0, 0, 200, 200), Qt::gray);
    painter.setPen(QPen(Qt::white, 4, Qt::DashLine));
    painter.drawLine(QLine(0, 35, 200, 35));
    painter.drawLine(QLine(0, 165, 200, 165));
}


If I want to save it into an SVG file, it would be something like this

void MainWindow::saveSvg()
{
    QString path = QFileDialog::getSaveFileName(this, tr("Save as SVG"),"", tr("SVG file (*.svg)"));

    if (path.isEmpty())
        return;

    QSvgGenerator generator;
    generator.setFileName(path);
    generator.setSize(QSize(200, 200));
    generator.setViewBox(QRect(0, 0, 200, 200));
    generator.setTitle(tr("SVG Generator Example Drawing"));
    generator.setDescription(tr("An SVG drawing created by the SVG Generator "
                             "Example provided with Qt."));
    QPainter painter;
    painter.begin(&generator);
    paint(painter);
    painter.end();
}


If I want to save it into an image file, it would be something like this.

void MainWindow::savePng()
{
    QString path = QFileDialog::getSaveFileName(this, tr("Save as image"), "", tr("PNG file (*.png)"));

    if (path.isEmpty())
        return;

    QImage img(200, 200, QImage::Format_ARGB32);

    QPainter painter;
    painter.begin(&img);
    paint(painter);
    painter.end();

    img.save(path);
}

Note that if you  replace
QImage img(200, 200, QImage::Format_ARGB32);

QPainter painter;
painter.begin(&img);
paint(painter);
painter.end();
with
QImage img(this->size(), QImage::Format_ARGB32);
QPainter painter(&img);
this->render(&painter);
you'll be taking a screenshot of widget content into an image.


References:
SVG Generator Example
Capture Qt widget as an image file

Saturday, February 25, 2012

Qt Performance Tips

As I've been moving away from Qt, I thought I should write some notes about things I've been taking care of when writing a Qt application. Even if they are not the super-duper tips , they may be useful for some people out there.

These tips, and more you may know or apply by default, can make a huge impact on your application. As I remember, the right compination of these tips has helped me to reduce the time of a big operation, and I was shocked by numbers. Imagine a process that takes 7 milliseconds and a smooth UX  instead of 10~30 seconds and a laggy UX!

1- QCoreApplication::processEvents
When getting inside a long loop (for or while loop) the application will freeze because of the intensive resource consumption, so it is advised to process events inside the loops to allow other thread to run. You will notice the difference if, for example, you have a progress bar and you update it from inside the loop. The progress bar UI will not be updated eventhough its values have been set, because the loop is not giving the chance for other processes to work. A line like the following can do the job:
qApp->processEvents();


2- Timer slots instead of threads
Sometimes you want to make a non-blocking process inside your application, so you make another thread, then may get in the hastle of communication with the current thread or modifying the UI. An example I saw and liked was as follows:
QTimer::singleShot(0, this, SLOT(doSomething()));

It was used in a GUI application when there was much code to write in the constructor, and the code was making much delay in the appearence of the main window. So the solution was to move this code to a slot with zero timeout.
Another usage was when querying much data from a database, showing the results of the query simultiniously in the UI (e.g. filling a datasheet line by line) instead of waiting for the query to finish had a great impact on both performance and user experience.


3- QCache
One of the tasks I hate in my application is accessing a database or filesystem. So using the QCache class in my application could minimize the time of accessing a file or database. If you know how computer cache memory works on hardware level you will get the idea. When I query some data from database, I save them in QCache. So the next time I need the data, I look for it inside my cache member before going to the database. If I find it, I use it. I don't find it, I go to the database. This can help boosting the performance if you have an intensive usage of your database or filesystem in runtime (like a game data maybe or history suggestions). So what it the advantage of QCache over QMap or other classes? Here is a quote from the documentation:
When inserting an object into the cache, you can specify a cost, which should bear some approximate relationship to the amount of memory taken by the object. When the sum of all objects' costs (totalCost()) exceeds the cache's limit (maxCost()), QCache starts deleting objects in the cache to keep under the limit, starting with less recently accessed objects.

4- Qt Resource System
"The Qt resource system is a platform-independent mechanism for storing binary files in the application's executable". But it is not always the best choice when you have a lot of files. Remember that this increases the size of your executable, and memory usage. So when you have files that can be placed beside the app instead of beig inside it, this will make less memory usage, leaving more momory for later computations, especially when you have limited hardware resources. Keep the resource system for a minimal number of basic resources like, as the documantation says, a certain set of files (icons, translation files, etc.) that you don't want to run the risk of losing them.


5- Painting
When you paint some graphics inside the application, whether for a game or just a background, it is advisable to take care of the following.
a) You do not always need to repaint all the space. Sometimes, for example, you want to update a logo at the center of your window or splash screen, then why repainting hundreds of thousands of pixels when you only want to repaint a 64x64 rectangle in the middle?
b) When you repaint the same image over and over (for example, a background in the update() method), it is useless to load the image every time in a temporary variable inside the method because loading takes time. It is better to declare a local variable in your header file and load it once (in the constructor or anywhere when needed) then only repaint it without reloading the same image.


6- Database indexing
This may not be a Qt-specific tip, but it is still very important when you have a database of tables of 500,000 entries.
A database index is a data structure that improves the speed of data retrieval operations on a database table at the cost of slower writes and increased storage space. [Wikipedia]
If you do not know about this topic, I suggest you spent an hour reading and applying it on any database to notice the difference it makes.


7- You application in idle state
Some application features are only useful when the user is looking at them. For example when you are retrieving weather conditions from a remote server. What is the benefit of downloading an XML file, parsing, and updating your UI every couple of minutes when the user is not even looking? When the user is in a state when he does not benefit from a feature, it is better to stop/pause it.


So ... these were the performance tips I had in mind till now. I hope you learned something new from them.

Wednesday, October 12, 2011

Read/Edit Phone Contacts Using Qt

Here I'm posting a code snippet I used to modify my contacts on both SIM card and phone memory. What this code does is that it loops over all available memories on phone and edits each number according to a criteria I set. To simplify the code, I removed the business parts and posted only the parts related to Qt Framework and the loop over the contacts.

 The skeleton of the process is as follows:

  1. Get all available manager on device. In my case they where "symbian" (i.e: phone memory) and "symbiansim" (i.e: SIM card)
  2. Loop over the list of managers.
  3. For each manager, get the ids of available contacts.
  4. For each contact id, get all the available phone numbers.
  5. For each phone number, decide if it needs to be changed (the business part), or just output the number or use it however you want.
  6. A couple of flags are set to save any changes in a number/contact


[*.pro]
symbian:TARGET.CAPABILITY += ReadUserData WriteUserData

CONFIG += mobility
MOBILITY += contacts


[*.h]
#include <QContactManager>
#include <QContact>
#include <QContactPhoneNumber>

QTM_USE_NAMESPACE


[*.cpp]
//find all the available mamagers on device
QStringList managers = QContactManager::availableManagers();

//loop on all the available managers
for(int m=0; m<managers.length(); m++)
{
    //initialize a new contact manager with one of the ids in "mamagers" list
    QContactManager cManager(managers.at(m));

    QList<QContactLocalId> idsList = cManager.contactIds();
    
    //loop on all the available contacts
    for(int i=0; i<idsList.length(); i++)
    {
        QContact contact = cManager.contact(idsList.at(i));
        bool contactEdited = false;
        
        //get all contact details the can be considered a phone numbers (mobile, home .. etc)
        QList<QContactPhoneNumber> phoneNumbers = contact.details<QContactPhoneNumber>();

        //iterate on the phone numbers of the contact
        for(int idx=0; idx<phoneNumbers.length(); idx++)
        {
            QContactPhoneNumber phone = phoneNumbers.at(idx);
            QString number = phone.value(QContactPhoneNumber::FieldNumber);
            bool numberEdited = false;

            // ################### Editing Zone #################
            
            // here you put any operations related to editing the number
            // and set the "edited" flag to true if you changed the number
            
            // ##################################################

            //if the number is edited, save it in the "contact" object
            if(numberEdited)
            {
                phone.setNumber(number);
                contact.saveDetail(&phone);
                
                //raise the contactEdited flag to save the contact later
                contactEdited = true;
            }
        } // end of numbers loop

        if(contactEdited)
        {
            //save the edited contact
            cManager.saveContact(&contact);
        }
    } // end of contacts loop
} // end of managers loop


Here are some notes about this code:
- If you need to interact with one manager, just pass one item to the "managers" list, or simply remove the managers loop.and set the manager manually.
QContactManager cManager("symbiansim");
- It is a good practice to not freeze the application with all these nested loops. So if you are sure that no other event can cause a problem while executing these operations, you can insert this line inside each loop.
qApp->processEvents();
- Self-signing is enough to get this code running on a Symbian device.


Thursday, June 2, 2011

Qt Folder Compression

I needed a compression module that does not depend on anything but Qt, and I mean a module to compress a complete folder with its children. This is because I wanted the compression module to work on any platform supported by Qt with no other dependencies. So I made this modules that only uses only qCompress() & qUncompress() methods plus some logic.

It is mainly a recursive algorithm that serializes data into a single file, each with its relative path to the parent folder. And deserializing is just taking binary data, creating needed subfolders, and saving the file.

Download: QtFolderCompressor.zip

[FolderCompressor.h]
#ifndef FOLDERCOMPRESSOR_H
#define FOLDERCOMPRESSOR_H

#include <QFile>
#include <QObject>
#include <QDir>

class FolderCompressor : public QObject
{
    Q_OBJECT
public:
    explicit FolderCompressor(QObject *parent = 0);

    //A recursive function that scans all files inside the source folder
    //and serializes all files in a row of file names and compressed
    //binary data in a single file
    bool compressFolder(QString sourceFolder, QString destinationFile);

    //A function that deserializes data from the compressed file and
    //creates any needed subfolders before saving the file
    bool decompressFolder(QString sourceFile, QString destinationFolder);

private:
    QFile file;
    QDataStream dataStream;

    bool compress(QString sourceFolder, QString prefex);
};

#endif // FOLDERCOMPRESSOR_H


[FolderCompressor.cpp]
#include "FolderCompressor.h"

FolderCompressor::FolderCompressor(QObject *parent) :
    QObject(parent)
{
}

bool FolderCompressor::compressFolder(QString sourceFolder, QString destinationFile)
{
    QDir src(sourceFolder);
    if(!src.exists())//folder not found
    {
        return false;
    }

    file.setFileName(destinationFile);
    if(!file.open(QIODevice::WriteOnly))//could not open file
    {
        return false;
    }

    dataStream.setDevice(&file);

    bool success = compress(sourceFolder, "");
    file.close();

    return success;
}

bool FolderCompressor::compress(QString sourceFolder, QString prefex)
{
    QDir dir(sourceFolder);
    if(!dir.exists())
        return false;

    //1 - list all folders inside the current folder
    dir.setFilter(QDir::NoDotAndDotDot | QDir::Dirs);
    QFileInfoList foldersList = dir.entryInfoList();

    //2 - For each folder in list: call the same function with folders' paths
    for(int i=0; i<foldersList.length(); i++)
    {
        QString folderName = foldersList.at(i).fileName();
        QString folderPath = dir.absolutePath()+"/"+folderName;
        QString newPrefex = prefex+"/"+folderName;

        compress(folderPath, newPrefex);
    }

    //3 - List all files inside the current folder
    dir.setFilter(QDir::NoDotAndDotDot | QDir::Files);
    QFileInfoList filesList = dir.entryInfoList();

    //4- For each file in list: add file path and compressed binary data
    for(int i=0; i<filesList.length(); i++)
    {
        QFile file(dir.absolutePath()+"/"+filesList.at(i).fileName());
        if(!file.open(QIODevice::ReadOnly))//couldn't open file
        {
            return false;
        }

        dataStream << QString(prefex+"/"+filesList.at(i).fileName());
        dataStream << qCompress(file.readAll());

        file.close();
    }

    return true;
}

bool FolderCompressor::decompressFolder(QString sourceFile, QString destinationFolder)
{
    //validation
    QFile src(sourceFile);
    if(!src.exists())
    {//file not found, to handle later
        return false;
    }
    QDir dir;
    if(!dir.mkpath(destinationFolder))
    {//could not create folder
        return false;
    }

    file.setFileName(sourceFile);
    if(!file.open(QIODevice::ReadOnly))
        return false;

    dataStream.setDevice(&file);

    while(!dataStream.atEnd())
    {
        QString fileName;
        QByteArray data;

        //extract file name and data in order
        dataStream >> fileName >> data;

        //create any needed folder
        QString subfolder;
        for(int i=fileName.length()-1; i>0; i--)
        {
            if((QString(fileName.at(i)) == QString("\\")) || (QString(fileName.at(i)) == QString("/")))
            {
                subfolder = fileName.left(i);
                dir.mkpath(destinationFolder+"/"+subfolder);
                break;
            }
        }

        QFile outFile(destinationFolder+"/"+fileName);
        if(!outFile.open(QIODevice::WriteOnly))
        {
            file.close();
            return false;
        }
        outFile.write(qUncompress(data));
        outFile.close();
    }

    file.close();
    return true;
}

Wednesday, June 1, 2011

ZLib Static Library for Qt/Symbian

I've been surfing the internet looking for the zlib static library -which is missing from the Qt/Symbian SDK. I downloaded and installed some old Symbian SDKs and finally found the needed files.

You can download them from this link


Here is a code example of how I used it:

LIBS+= -lefsrv -lezlib -leikcore -lcone

#include <ezgzip.h>
#include <f32file.h>
#include <ezcompressor.h>
#include <ezdecompressor.h>
#include <ezfilebuffer.h>
#include <eikenv.h>

void CompressFileL(QString sourceFile, QString destinationFile)
{
    TPtrC16 aSrcFile(reinterpret_cast<const TUint16*>(sourceFile.utf16()));
    TPtrC16 aDesFile(reinterpret_cast<const TUint16*>(destinationFile.utf16()));
    
    CEZFileBufferManager* fileCompressor = NULL;
    CEZCompressor* comprsr = NULL;
    RFs iFs = CEikonEnv::Static()->FsSession();
    RFile inFile,outFile;
    User::LeaveIfError(inFile.Open(iFs,aSrcFile,EFileRead));
    CleanupClosePushL(inFile);
    User::LeaveIfError(outFile.Create(iFs,aDesFile,EFileRead | EFileWrite));
    CleanupClosePushL(outFile);

    fileCompressor = CEZFileBufferManager::NewLC(inFile,outFile);
    comprsr = CEZCompressor::NewLC(*fileCompressor,CEZCompressor::EBestCompression);

    TBool res = EFalse;
    do
    {
        res = comprsr->DeflateL();
    }while(res);

    CleanupStack::PopAndDestroy(4);//inputFile,outFile,fileCompressor,comprsr
}


void DecompressFileL(QString sourceFile, QString destinationFile)
{
    TPtrC16 aSrcFile(reinterpret_cast<const TUint16*>(sourceFile.utf16()));
    TPtrC16 aDesFile(reinterpret_cast<const TUint16*>(destinationFile.utf16()));
    
    CEZFileBufferManager* fileCompressor = NULL;
    CEZDecompressor* decomprsr = NULL;
    RFs iFs = CEikonEnv::Static()->FsSession();
    RFile inFile,outFile;
    User::LeaveIfError(inFile.Open(iFs,aSrcFile,EFileRead));
    CleanupClosePushL(inFile);
    User::LeaveIfError(outFile.Create(iFs,aDesFile,EFileRead | EFileWrite));
    CleanupClosePushL(outFile);

    fileCompressor = CEZFileBufferManager::NewLC(inFile,outFile);
    decomprsr = CEZDecompressor::NewLC(*fileCompressor);

    TBool res = EFalse;
    do
    {
        res = decomprsr->InflateL();
    }while(res);

    CleanupStack::PopAndDestroy(4);//inputFile,outFile,fileCompressor,decomprsr
}

Saturday, April 2, 2011

Interfacing Parallel Port using Qt

I've been in a situation today where I wanted a quick app to interact with the parallel port. Although it is no big deal, it was my first time. So I wanted to document it and make a simple application.

There is no Qt API to access the parallel port, so there was no other way but using an extra DLL: inpout32.dll. The core of code in brief is like that:

Note: the DLL was not available by default. So I downloaded it and Had the choice to put it in C:\Windows\System32 or just point to it in the application's folder.

*.h
#include <windows.h>

/* prototype (function typedef) for DLL function Inp32: */
typedef short _stdcall (*inpfuncPtr)(short portaddr);
typedef void _stdcall (*oupfuncPtr)(short portaddr, short datum);

private:
    HINSTANCE hLib;
    inpfuncPtr inp32;
    oupfuncPtr oup32;
    short portData; //must be in hex
    int portNumber; //must be in hex

*.cpp
/* Load the library */
hLib = LoadLibraryA("inpout32.dll");

/* get the address of the function */
inp32 = (inpfuncPtr) GetProcAddress(hLib, "Inp32");
oup32 = (oupfuncPtr) GetProcAddress(hLib, "Out32");
Note: I faced an encoding error with LoadLibrary(). so I used LoadLibraryA() instead.

Reading
portData = (inp32)(portNumber);

Writing
(oup32)(portNumber, portData);

A useful hint for converting from QString to Hex/Binary, and vise versa
//QString to Hex
portNumber = myString.toInt(&ok, 16);

//Hex to QString
myString = QString::number(portData, 16);

Note: Icons in this application are free! http://www.freedesktop.org/


Download source code
Download executable

Resources:
Parallel Port Output On Windows XP using Qt4 and C++
MinGW: char to WCHAR

Saturday, December 18, 2010

[Qt] Push-ups Counter: Step2-Look&Feel

So ... It looks like I lack that talent of Look&Feel stuff. I've been trying to make something fancy but I just couldn't.

Anyways, this is the last version of the application. It has only one screen. It contains the option of "Silent Mode" which disables the beep during exercise (the beep of reaching the up/down level). And when stopping the counter, it shows a message with the time elapsed since starting.


Here is the code in case you want to take a look: (Download)


Creative Commons License
Blog Example by Mahmoud Adly Ezzat is licensed under a Creative Commons Attribution-ShareAlike 3.0 Unported License.

Saturday, December 11, 2010

[Qt] Push-ups Counter: Step1-Functionality

I made the first version of my Push-ups counter using Qt. It is based on using the accelerometer to sense the movement of the mobile. In this version:
- It has a settings screen with only one option till now: Mute Sound.
- The next screen counts the push-ups depending on some internally-set variables (the positions of up/down)
- It makes a beep when I reach the up/down position, so I know if I'm up/down enough.
= I noticed that if my arm shakes, it may count extra points.(to be fixed)


The main important points in the application are how to read the device's position and how to count.
To read the position, I read the "x" value of the accelerometer:
I use two classes: QSensor, QSensorReading

QSensor *sensor = new QSensor("QAccelerometer");
sensor->start();
QSensorReading *reading = sensor->reading();
int value = abs(reading->property("x").value<qreal>()/1);

Some notes:
- The abs() method is because the value can be +ve or -ve depending on which arm I use, so I just take the absolute value.
- The value<qreal>()/1 is a simple way of moving any noise. If I get the value as int, it will be in a big range (I can't remember it right now), and it may be useful in sensitive applications but not in this case. The range I get is 0-9. And the division by 1 is to neglect the fractions.


I added two flags to detect if the next calculation to for going up or down. An a timer to calculate the value of the accelerometer every period of time. I know that the QSensor class has a signal of readingChanged(), but it is very rapid and will exhaust the processor.

void CounterWindow::readSensorValue()
{
    int value = abs(reading->property("x").value<qreal>()/1);

    if(nextUp)
    {
        if(value <= upValue)
        {
            if(!muted) QApplication::beep();
            nextUp = false;
            nextDown = true;
            score++;
            counterLabel->setText(QString::number(score));
        }
    }
    else if(nextDown)
    {
        if(value >= downValue)
        {
            if(!muted) QApplication::beep();
            nextUp = true;
            nextDown = false;
        }
    }
}


I also had to add some Symbian code to disable the change of orientation when the mobile rotates and force the Portrait orientation.

[PushupsCounter.pro]
symbian {
    LIBS += -lcone -leikcore -lavkon
}

[main.cpp]
// Needed Symbian specific headers
#ifdef Q_OS_SYMBIAN
#include <eikenv.h>
#include <eikappui.h>
#include <aknenv.h>
#include <aknappui.h>
#endif

and add this code before calling the window
[main.cpp]
StartingWindow w;
#if defined(Q_OS_SYMBIAN)
    CAknAppUi* appUi = dynamic_cast<CAknAppUi*>(CEikonEnv::Static()->AppUi());
        if(appUi){
            QT_TRAP_THROWING(appUi ->SetOrientationL(CAknAppUi::EAppUiOrientationPortrait));
        }
#endif
    w.showMaximized();


So... the next step is for the Look&Feel and fixing any bug that may appear.

Download v1.0


Creative Commons License
Blog Example by Mahmoud Adly Ezzat is licensed under a Creative Commons Attribution-ShareAlike 3.0 Unported License.

Saturday, December 4, 2010

Singleton Download Queue for Qt

Every now and then, I need to use the QNetworkAccessManager class in my applications, and have some synchronization problems every now and then.

So, I used the same behavior I find in the fast food restaurant. I make an order and take a ticket with a number. When an order is ready, they call for the number of it's ticket. If it is mine, I go and get it.

Here are the important methods:
[DownloadQueue]
public:
    int         addUrl(QUrl url);
    bool        removeUrl(int index);

    QByteArray  getData(int index);
    bool        removeData(int index);

    int         getCurrentIndex();
    bool        clear();

signals:
    void downloadFinished(int index);

When I want to make a new download, I add the url to the DownloadQueue class and get an index to the added url. I can remove the url if I need, using the same index.

Whenever a download is finished, the class emits a signal with its index, so I should make a slot to listen for these 'announcements'. If the announced index is the one I ordered, I can get its ready data by using getData() method.

Beware that the received data resides in the memory until you remove it, even though you called getData().

Another method is for checking the current processed index, just to know if my order is taking long or going to be next...etc. And the clear method to empty all the queue.

Another twist is made to make the same queue accessible by all classes. So the class is a singleton. And an instance is made like this
//example
DownloadQueue *d = DownloadQueue::getInstance();
Thanks to Mahmoud Mamdouh for helping me with the singleton thing.

Here is the complete class:
(Download)

[DownloadQueue.h]
#ifndef DOWNLOADQUEUE_H
#define DOWNLOADQUEUE_H

#include <QNetworkAccessManager>
#include <QNetworkReply>
#include <QNetworkRequest>
#include <QObject>
#include <QTimer>
#include <QUrl>

class DownloadQueue : public QObject
{
    Q_OBJECT

public:
    static DownloadQueue* getInstance();

    int         addUrl(QUrl url);
    bool        removeUrl(int index);

    QByteArray  getData(int index);
    bool        removeData(int index);

    int         getCurrentIndex();
    bool        clear();

private:
    DownloadQueue(QObject *parent = 0);
    static DownloadQueue *_instance;
    int _index;
    QTimer _timer;
    QUrl _url;
    QList<QUrl> _urlList;
    QList<QByteArray> _dataList;
    QNetworkAccessManager _manager;

signals:
    void downloadFinished(int index);

private slots:
    void handleNetworkReply(QNetworkReply *reply);
    void downloadNext();

};

#endif // DOWNLOADQUEUE_H

[DownloadQueue.cpp]
#include "downloadqueue.h"

DownloadQueue * DownloadQueue::_instance = 0;

DownloadQueue* DownloadQueue::getInstance()
{
    if(_instance == 0) _instance = new DownloadQueue();
    return _instance;
}

DownloadQueue::DownloadQueue(QObject *parent):
        QObject(parent)
{
    _urlList.clear();
    _dataList.clear();
    connect(&_manager, SIGNAL(finished(QNetworkReply*)), this, SLOT(handleNetworkReply(QNetworkReply*)));

    _index = 0;

    connect(&_timer, SIGNAL(timeout()), this, SLOT(downloadNext()));
    _timer.setInterval(500);
    _timer.start();
}

int DownloadQueue::addUrl(QUrl url)
{
    _urlList << url;
    QByteArray data;
    _dataList << data;
    return _urlList.length()-1;
}

bool DownloadQueue::removeUrl(int index)
{
    if((index < _urlList.length()) || (index != _index))
    {
        _urlList.replace(index, QUrl(""));
        return true;
    }

    return false;
}

QByteArray DownloadQueue::getData(int index)
{
    QByteArray data;
    if(index < _dataList.length())
        data = _dataList.at(index);

    return data;
}

bool DownloadQueue::removeData(int index)
{
    if(index < _dataList.length())
    {
        QByteArray data;
        _dataList.replace(index, data);
        return true;
    }

    return false;
}

int DownloadQueue::getCurrentIndex()
{
    return _index;
}

bool DownloadQueue::clear()
{
    _timer.stop();
    _urlList.clear();
    _dataList.clear();
    return true;
}

void DownloadQueue::handleNetworkReply(QNetworkReply *reply)
{
    QByteArray data = reply->readAll();
    _dataList.replace(_index, data);

    emit downloadFinished(_index);
    _index++;
    _timer.start();
}

void DownloadQueue::downloadNext()
{
    if(_index < _urlList.length())
    {
        _timer.stop();
        _manager.get(QNetworkRequest(_urlList.at(_index)));
    }
}

Here is a dummy example to show the basic use of the class.(click me)


Creative Commons License
Blog Example by Mahmoud Adly Ezzat is licensed under a Creative Commons Attribution-ShareAlike 3.0 Unported License.

Friday, November 26, 2010

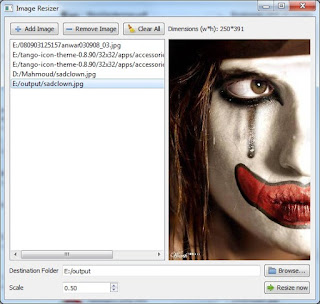
Image Resizer Example [Qt]

I've been making a small example to resize images, then did not want to just archive it, so I thought about sharing it.
  • Images to resize are added to the list through the above buttons or drag/drop.
  • A preview of the selected image appears along with width and height (in pixels).
  • One scale is set to resize all the images.
  • Icons used in the example are all free: http://tango.freedesktop.org/
  • The complete example is here: [Qt code] - [Executable]


Please tell me if you find a bug, or edit it.


Creative Commons License
Blog Example by Mahmoud Adly Ezzat is licensed under a Creative Commons Attribution-ShareAlike 3.0 Unported License.

Saturday, November 13, 2010

[Qt] Kinetic Scrolling: Ariya's Example Arabic Wrapper

I've been looking for a way to implement kinetic scrolling. And I found it here , it was a great example for kinetic scrolling but neither commented nor ready to use in other projects.


So, I worked on it, put comments on some important lines of code, added some options, and wrapped it in an easy-to-use class.

This class can be used in the design like any widget you may have used; like QListWidget for example.

Here are the features of this class:
- Right alignment and Arabic text support.
- Icon/Iconless view.
- The choice of background/selection colors.
- Emits a signal if an item is selected twice (better than double clicking).


Here are the emportant methods and signals you'll need

[FlickableList]
public:
    FlickableList(bool withIcons = false, QWidget *parent = 0);

    void addItem(QString itemString);
    void addItem(QString itemString, QPixmap icon);

    void setBackgroundColor(QColor backgroundColor);
    void setSelectedItemColor(QColor selectedItemColor);

signals:
    void itemSelected(int row);

I uploaded an example with the class. It is a very basic example that shows some lines of "أوبونتو" and a message appears if an item is selected twice indicating the row number. I tested it on Desktop/Simulator/S60 Device.


All you need to use this class is the folder called "FlickableList".
(Download Full Example & Class)


References:
Qt Labs - Kinetic scrolling on any widgets [Posted by Ariya Hidayat]


Creative Commons License
Blog Example by Mahmoud Adly Ezzat is licensed under a Creative Commons Attribution-ShareAlike 3.0 Unported License.

Friday, November 12, 2010

Passing Parameters to a QMetaObject in Qt

The target scenario is as follows:
- Window(A) calls Window(B) and then Window(A) is closed.
- When Window(B) is closed we want to go back to Window(A). But Window(A) needs some parameters in the constructor. How to know these parameters, an the exact values?

One solution is to pass the previously known parameters from (A) to (B), then when (B) is destroyed, it will create an instance from (A) with these parameters. But this is not generic, because if (B) is called in an application by two different windows, how do we know which Window(A or C) called it?
To make the process more generic, here is a solution:

In Window(A): make a 'struct' containing all the parameters needed by the constructor.

Make a new constructor for class (A) that takes a void pointer (void* myPointer) and has a macro Q_INVOKABLE before it.

ex:
WindowA(int number, QString text);
Q_INVOKABLE WindowA(void* params);

In the original constructor, save the parameters in the struct you made

ex:
c_params->number = number;
c_params->text = text;

And when calling Window(B) you pass the "staticMetaObject" of the current class and the struct instance as a void pointer.

ex:
WindowB* b1 = 
    new WindowB(WindowA::staticMetaObject, (void*)c_params);

Note: the WindowA must have a Q_OBJECT macro it its definition.

ex:
class WindowA : public QMainWindow
{
    Q_OBJECT

public:
    WindowA(int number, QString text, QWidget *parent = 0);
    Q_INVOKABLE WindowA(void* params, QWidget *parent = 0);
    ~WindowA();
private:
    Ui::WindowA *ui;
    ClassParam *c_params;
private slots:
    void on_pushButton_clicked();
};

and of course the constructor of WindowB may look like this (and can have any extra needed parameters):
WindowB(QMetaObject metaobject, void* params);

We save these parameters in some local variables to be used later.

ex:
private:
    QMetaObject parentForm;
    void* c_params;

And whenever we want to call ClassA, we do as follows:
QMainWindow* w = 
    (QMainWindow*)(parentForm.newInstance(Q_ARG(void*, c_params)));

Here I casted the parent form instance as a QMainWindow because it inherits from it.
Note that the parameters passed in the newInstance() method are passed in a void pointer. And to do this, I used the macro Q_ARG(void*, c_params) which takes the type of the parameter (void*) and the data (c_params).

Now we move back to WindowA to see how it works.
This time the invokable constructor is the one to be called:
Q_INVOKABLE ClassA(void* params);

inside this constructor I cast the void pointer as struct pointer, and then I can read its data and do whatever I want.

ex:
c_params = (ClassParam*)params;
int i = c_params->number;
QString s = c_params->text;


A simple example is attached, and has some comments for a clearer understanding.
(Download)


Creative Commons License
Blog Example by Mahmoud Adly Ezzat is licensed under a Creative Commons Attribution-ShareAlike 3.0 Unported License.

Thursday, October 7, 2010

Software Development with Qt and the Nokia Qt SDK

This is a very good presentation for Qt and Nokia Qt SDK. It is not mine but I found it very useful. Throughout this presentation you can learn much from the basics to more advanced topics. By the end of this presentation, I guess you can make a better overview and know what to learn.


Tuesday, August 31, 2010

File-based Logging in Qt

[This entry is a refinement of an article I found here]

Testing applications for mobiles or embedded systems is very hard most of the time because I'm not always able to debug the application on the device. One solution was to write some debugging lines inside the program, and when the program passes each of these lines, the line will be written to a text file. Then I can simply open the text file and see how the application went or where it stopped.

Here it how it goes:

- Before the main(), I write:

using namespace std;
ofstream logfile;

void SimpleLoggingHandler(QtMsgType type, const char *msg)
{
    switch (type) {
        case QtDebugMsg:
            logfile << QTime::currentTime().toString().toAscii().data() << " Debug: " << msg << "\n";
            break;
        case QtCriticalMsg:
            logfile << QTime::currentTime().toString().toAscii().data() << " Critical: " << msg << "\n";
            break;
        case QtWarningMsg:
            logfile << QTime::currentTime().toString().toAscii().data() << " Warning: " << msg << "\n";
            break;
        case QtFatalMsg:
            logfile << QTime::currentTime().toString().toAscii().data() <<  " Fatal: " << msg << "\n";
            abort();
        }
    }

where each line of
logfile << QTime::currentTime().toString().toAscii().data() << " Debug: " << msg << "\n";
represents the format before each message I write. In this example I write the time, then the type of message, then the message.


- Then inside the main():
logfile.open("E:/myFile.txt", ios::app);
qInstallMsgHandler(SimpleLoggingHandler);


- Now at any class, if I want to write a message, I will just include:
#include <QDebug>

and write the line I want. For example:
qDebug()<< "[XmlClass] Receiving xml data from httpclient";
[I added class name between square brackets to know the class I am in]

Friday, August 20, 2010

Mobile Softkeys in Qt

[Nokia Qt SDK v1.0 - 23 June 2010 ]

When programming for Symbian, it is essential to make use of the available buttons. Here is how to assign the left and right buttons.

//Left Button
QAction *okSoftKeyAction = new QAction(QString("Ok"), this);
okSoftKeyAction->setSoftKeyRole(QAction::PositiveSoftKey);
connect(okSoftKeyAction, SIGNAL(triggered()), this, SLOT(mySlot1()));
addAction(okSoftKeyAction);

//Right Button
QAction *cancelSoftKeyAction = new QAction(QString("Cancel"), this);
cancelSoftKeyAction->setSoftKeyRole(QAction::NegativeSoftKey);
connect(cancelSoftKeyAction, SIGNAL(triggered()), this, SLOT(mySlot2()));
addAction(cancelSoftKeyAction);

where the left button is the PositiveSoftKey and the right button is the NegativeSoftKey. And mySlot1() and mySlot2() are any slots I make or use.

Notes:
  • When trying this on the emulator of Nokia Qt SDK v1.0, I still see the original 'Options' and 'Exit' buttons. They are fake. When I tried it on my mobile (Nokia 5530) I could see the effects for real.
  • There are many articles in Nokia Forum and many other forums talking about softkeys but their code just doesn't compile. This is because the new Qt 4.7 is different. Here is their code:
[the setSoftkeys() method no longer exists in QWidget]
/* Create ok left softkey */
QAction* ok = new QAction(tr("OK"), this);
/* Let's make it ok softkey */
ok->setSoftKeyRole(QAction::OkSoftKey);
/* Connect action to dialogs accept slot,
* which will then emit accepted signal. */
connect(ok, SIGNAL(triggered()), this, SLOT(accept()));
 
/* Create cancel right softkey */
QAction* cancel = new QAction(tr("Cancel"), this);
/* Let's make it cancel softkey */
cancel->setSoftKeyRole(QAction::CancelSoftKey);
/* Connect action to dialogs reject slot,
* which will then emit rejected signal. */
connect(cancel, SIGNAL(triggered()), this, SLOT(reject()));
 
/* Set softkeys */
QList<QAction*> mySoftKeys;
mySoftKeys.append(ok);
mySoftKeys.append(cancel);
widget->setSoftKeys(mySoftKeys);

[special thanks to TamsS60]

Saturday, July 24, 2010

SQLite: 3.Qt and SQLite

I mentioned before that SQLite is a C library. To use this library in C++ applications, you can use many wrappers. But since I'm going in the direction of Qt, I want to use the QtSql module. QtSql module uses some drivers to communicate with databases like SQLite, MySQL, Oracle ...


Or add
//in the *.pro file
QT += sql
and include
//in any class
#include <QtSql>


The process is very easy: Create a database object. Open it. Then execute some queries.

For this entry, I created a project to explain the basic features of QtSql. I will try to explain some parts of it, and you can download it and try to understand the complete code.


Viewing Table Contents:

To view table contents, you need a QSqlTableModel object. QSqlTableModel is a high-level interface for reading and writing database records from a single table.

A simple way to use it is like this:
After creating a database object, I create a QSqlTableModel object and connect it to my database. Then I name the table I want this object to represent.
QSqlDatabase *database = new QSqlDatabase();


//set database driver to QSQLITE
*database = QSqlDatabase::addDatabase("QSQLITE");


database->setDatabaseName("./phonebook.db");

QSqlTableModel *all_model = new QSqlTableModel(this, *database);


all_model->setTable("Contacts");

all_model->select();


Then I can use this model to preview the contents of this table in some 'item views' available in the GUI designers (List View, Tree View, Table View, Column View)

ui->contacts_tableView->setModel(all_model);

QSqlTableModel has some other methods like: sorting, filtering, editing a record...etc. For example, searching a database and viewing results can be implemented by filtering the current model:

//search database for a certain name
search_model->setFilter("Name = \'"+ui->search_lineEdit->text()+"\'");


Queries:

QSqlQuery is a class that provides a means of executing and manipulating SQL statements. Its simplest statement looks like this:
QSqlQuery query("delete from Contacts where Mobile = 1234");
query.exec();

The exec() method returns 'true' if query is successful, and 'false' if it fails.

To make a query containing some variables, you can do this:

QSqlQuery query ("insert into Contacts (Name, Mobile, City) values (:name, :mobile, :city)");
    query.bindValue(0, ui->add_name_lineEdit->text());
    query.bindValue(1, ui->add_mobile_lineEdit->text());
    query.bindValue(2, ui->add_city_lineEdit->text());

    if(!query.exec())
    {
        QMessageBox::warning(0,"Error", "Please check your entered data.");
        return;
    }

where 0, 1, and 2 are the positions of the variables :name, :mobile, and :city. You can also replace the positions by the variable names:

    query.bindValue(":name", ui->add_name_lineEdit->text());
    query.bindValue(":mobile", ui->add_mobile_lineEdit->text());
    query.bindValue(":address", ui->add_city_lineEdit->text();

Note: sometimes i needed to change the query depending on a certain condition. One way to do this is using the prepare() method:

    QSqlQuery query;

    if(ui->remove_name_radioButton->isChecked())
    {
         query.prepare("delete from Contacts where Name = \'" + ui->remove_lineEdit->text()+"\'");
    }
    else
    {
        query.prepare("delete from Contacts where Mobile = \'" + ui->remove_lineEdit->text()+"\'");
    }

    if(!query.exec())
    {
        QMessageBox::warning(0,"Error", "Please check your entered data.");
        return;
    }


The Complete Example:

Now, here is the complete example for Qt with SQLite. It is a phonebook application that views all the contacts (using QSqlTableModel and a Table View), searches for a specific contact (using the filter() method of QSqlTableModel), and adds or removes a contact (using the queries).

Test it and read the code carefully. You can ask me anything you want.


Download


Creative Commons License
Blog Example by Mahmoud Adly Ezzat is licensed under a Creative Commons Attribution-ShareAlike 3.0 Unported License.

Sunday, July 4, 2010

Static Building for Qt Apps on Windows


I have talked before about dynamic building (click me) and now is the time for the static building. This is a long process that has many steps but I have to share my knowledge for those who are interested because I didn’t find a page that goes throw the entire process in details.
The main reason for static building is collecting all the needed DLLs that you need in a single executable file (*.exe), so the target computer does not need to install any packages or programs.

The steps are as follows:
1-    Configuring Qt Creator for static building, and compiling it.
2-    Building your application project statically using the configured Qt Creator.

1-    Configuring Qt Creator for static building:
Unfortunately, the normal Qt Creator that you install is only configured for static building. So you have to do one of the following:

1.1-    Download the Qt-Everywhere project and build your own customized Qt Creator:
-    This is done by downloading the (qt-everywhere-opensource-src-4.6.3.zip)
-    Uncompress the file in a directory like C:\Qt\4.6.3
-    Use Visual Studio Command Prompt to browse to this folder (is should be containing a ‘configure’ file).
-    Assuming you have Visual Studio 2005 or 2008, configure this project for windows with a command like this from Visual Studio Command Prompt (not tested):

configure -platform win32-msvc2008 –static –release -nomake demos -nomake examples –opensource -confirm-license -no-exceptions

for more configure options: type
configure –help
or download this file.

This may take about 30 minutes, and when done you can type
nmake sub-src
    then just relax and find something to do in the next two hours (give or take an hour)

1.2-    If you have already installed Qt Creator on your PC:
You can reconfigure it to build statically by writing the following command in the ‘Qt Command Prompt’ (I prefer taking a copy and configuring it, so I use the original for developing and debuggingm, and the new one for the final build):
configure -static -release -no-exceptions -nomake demos -nomake examples –opensource -confirm-license

then when done after about 30 minutes or less, type
mingw32-make sub-src

then just relax and find something to do in the next two hours (give or take an hour)


Now you have a Qt Creator configured for static building.


2-    Building your application project statically using the configured Qt Creator:

2.1 Create any Qt project you want, than add the following lines in the project (*.pro) file:
win32 {
      QMAKE_LFLAGS += -static-libgcc
      }

2.2 Now go to the Qt Command Prompt and browse to the folder of your application and type
C:\Qt\Qt-2010.01-static\qt\bin\qmake helloworld.pro

Where:

helloworld.pro is the project file of my Qt application.

qmake is the file used to create the Makefile.

C:\Qt\Qt-2010.01-static\qt\bin\ is the directory of qmake in the newly compiled Qt Creator.


2.3 Now write
mingw32-make

2.4 The statically built application can be found in the ‘Release’ folder in your project.

Some Comments:

1-    Why bothering myself and doing all these steps? For me, nothing is wrong with adding the needed DLLs in the same folder with the dynamically built application.
2-    There is this lovely warning that appears while configuring Qt:
WARNING: Using static linking will disable the use of plugins. Make sure you compile ALL needed modules into the library.
So I have to make sure that all the plugins that I may use in the future are available. (Click here for more:step3)


Example: Simple Map


Sources:

Wednesday, June 30, 2010

Dynamic Building for Qt Apps on Windows


قبل التحدث عن كيفية بناء مشروع Qt , أريد أن أوضح الفرق بين شيئين: Debug & Release

Debug Version : يحتوي البرنامج الناتج على بعض الإضافات التي تساعد في عملية الـdebugging مثل مراقبة المتغيرات داخل البرنامج و معرفة أي خطوة داخل البرنامج يتم تنفيذها الآن.


Release Version : يحدث شيء مختلف هنا و هو Code Optimization. أي قد تتم بعض التعديلات على الكود الخاص بك للزيادة من سرعة البرنامج أو توفيرا للذاكرة المستخدمة أو..... (للمزيد) . نتيجة لذلك يكون البرنامج أكثر سرعة من الـDebug Version و أقل حجما و لكن قد تلاحظ  بعض المشكلات نتيجة لعملية الـoptimization فيجب التأكد من ذلك بإعادة تجربة البرنامج بعد بنائه كـ release version .

طريقة البناء في Qt :

1-      قم باختيار  Build -> Set Build Configuration -> Release
(أو Build -> Open Build/Run Target Selector -> Desktop -> Release في إصدارة Nokia Qt SDK 1.0.1 )

2-      قم بالبناء من خلال Build -> Build Project

3-      الآن تجد البرنامج الناتج في مجلد Release داخل مجلد المشروع. و لكنه لن يعمل بعد

4-      الآن هناك بعض الـDLLs التي يجب وضعها بجانب البرنامج كي يعمل. سوف نأخذ نسخة منها من مجلد Qt . على سبيل المثال: المجلد الذي سآخذ منه هو C:\Qt\2010.01\qt\bin (قد يختلف قليلا حسب الإصدار أو مكان تثبيت Qt )

الملفات التي سآخذها أولا هي:
libgcc_s_dw2-1.dll
mingwm10.dll
QtCore4.dll

هناك بعض الملفات الإضافية التي آخذها حسب الـModules التي اخترتها عند إنشائي للمشروع. فمثلا إذا كان مشروعي قد استخدم GUI Module فسأحتاج لـ QtGui4.dll, و إذا استخدمت XML Module فسأحتاج إلى QtXml4.dll .... و هكذا. لابد من ملاحظة شيء مهم وهو أن هناك ملفات باسم مشابه و لكن مضاف إليها حرف d مثل QtCored4.dll و QtGuid4.dll .. و هي خاصة بالـdebug version فلا يجب أن نخلط بينهم (الملفات الخاصة بالـDebug أكبر في الحجم من الـRelease عدة مرات).


كل هذه الملفات أضعها بجانب البرنامج في نفس المجلد لأضمن عمله على أي جهاز.

هناك طريقة أخرى لجمع هذه الملفات بداخل البرنامج تسمى Static Building, و سأتحدث عنها لاحقا إن شاء الله.

Tuesday, June 29, 2010

C++ for Beginners: 2/2


هذا هو الجزء الثاني من C++ for Beginners و هدفه الأساسي التعريف ببعض الـ IDEs المستخدمة لإنشاء برامج C++ ذات واجهة رسومية GUI. لقد استخدمت اثنين بشكل أساسي و هما
Visual Studio
Qt
بالإضافة لمن رشّحوا استخدام NetBeans و Eclipse  و لكن لم أستخدمهم بعد. لذلك سأكتفي بالمقارنة بين ما استخدمته.

Platform:
Visual Studio : Works only on Windows
Qt: Works on Windows, Linux, Mac, Symbian … You just recompile your project on that platform to make a copy for it.
But if you only develop on Windows, this piece of info is not important.

GUI Design:
I liked the GUI in Qt much more than Visual Studio, because it has many useful elements, a variety of 3rd party classes, and a very very  important feature called ‘Layout’. It means that if you change the size of program window, the design will still fit inside it.

Debugging:
The debugging in Visual Studio is easier when debugging very big programs. But for normal programs, both Visual Studio and Qt are fine.

IntelliSense  (auto complete):
Both are fine, but Visual Studio has a more fancy one.

Event Handling:
Qt uses something called ‘Signals and Slots’ which makes event handling a lot easier than Visual Studio.

Documentation and Help:
Visual Studio is very popular, so there are a lot of forums that can help you. There are also lots of forums for Qt but not as much as Visual Studio.
For documentation, I found the documentation of Qt  more helpful than the MSDN of Visual Studio


بالنسبة لي فأنا أفضّل Qt أكثر من Visual Studio... و لكن يمكنكم أن تختبروهما و أي IDE آخر  تختارونه. ففي النهاية كل شخص يختار بناء على خبرات أو نقاط ذات اهتمام أكثر من الأخرى.


Websites to help:

NetBeans

Qt Free Reference: