Saturday, December 18, 2010

[Qt] Push-ups Counter: Step2-Look&Feel

So ... It looks like I lack that talent of Look&Feel stuff. I've been trying to make something fancy but I just couldn't.

Anyways, this is the last version of the application. It has only one screen. It contains the option of "Silent Mode" which disables the beep during exercise (the beep of reaching the up/down level). And when stopping the counter, it shows a message with the time elapsed since starting.


Here is the code in case you want to take a look: (Download)


Creative Commons License
Blog Example by Mahmoud Adly Ezzat is licensed under a Creative Commons Attribution-ShareAlike 3.0 Unported License.

Saturday, December 11, 2010

[Qt] Push-ups Counter: Step1-Functionality

I made the first version of my Push-ups counter using Qt. It is based on using the accelerometer to sense the movement of the mobile. In this version:
- It has a settings screen with only one option till now: Mute Sound.
- The next screen counts the push-ups depending on some internally-set variables (the positions of up/down)
- It makes a beep when I reach the up/down position, so I know if I'm up/down enough.
= I noticed that if my arm shakes, it may count extra points.(to be fixed)


The main important points in the application are how to read the device's position and how to count.
To read the position, I read the "x" value of the accelerometer:
I use two classes: QSensor, QSensorReading

QSensor *sensor = new QSensor("QAccelerometer");
sensor->start();
QSensorReading *reading = sensor->reading();
int value = abs(reading->property("x").value<qreal>()/1);

Some notes:
- The abs() method is because the value can be +ve or -ve depending on which arm I use, so I just take the absolute value.
- The value<qreal>()/1 is a simple way of moving any noise. If I get the value as int, it will be in a big range (I can't remember it right now), and it may be useful in sensitive applications but not in this case. The range I get is 0-9. And the division by 1 is to neglect the fractions.


I added two flags to detect if the next calculation to for going up or down. An a timer to calculate the value of the accelerometer every period of time. I know that the QSensor class has a signal of readingChanged(), but it is very rapid and will exhaust the processor.

void CounterWindow::readSensorValue()
{
    int value = abs(reading->property("x").value<qreal>()/1);

    if(nextUp)
    {
        if(value <= upValue)
        {
            if(!muted) QApplication::beep();
            nextUp = false;
            nextDown = true;
            score++;
            counterLabel->setText(QString::number(score));
        }
    }
    else if(nextDown)
    {
        if(value >= downValue)
        {
            if(!muted) QApplication::beep();
            nextUp = true;
            nextDown = false;
        }
    }
}


I also had to add some Symbian code to disable the change of orientation when the mobile rotates and force the Portrait orientation.

[PushupsCounter.pro]
symbian {
    LIBS += -lcone -leikcore -lavkon
}

[main.cpp]
// Needed Symbian specific headers
#ifdef Q_OS_SYMBIAN
#include <eikenv.h>
#include <eikappui.h>
#include <aknenv.h>
#include <aknappui.h>
#endif

and add this code before calling the window
[main.cpp]
StartingWindow w;
#if defined(Q_OS_SYMBIAN)
    CAknAppUi* appUi = dynamic_cast<CAknAppUi*>(CEikonEnv::Static()->AppUi());
        if(appUi){
            QT_TRAP_THROWING(appUi ->SetOrientationL(CAknAppUi::EAppUiOrientationPortrait));
        }
#endif
    w.showMaximized();


So... the next step is for the Look&Feel and fixing any bug that may appear.

Download v1.0


Creative Commons License
Blog Example by Mahmoud Adly Ezzat is licensed under a Creative Commons Attribution-ShareAlike 3.0 Unported License.

Saturday, December 4, 2010

Singleton Download Queue for Qt

Every now and then, I need to use the QNetworkAccessManager class in my applications, and have some synchronization problems every now and then.

So, I used the same behavior I find in the fast food restaurant. I make an order and take a ticket with a number. When an order is ready, they call for the number of it's ticket. If it is mine, I go and get it.

Here are the important methods:
[DownloadQueue]
public:
    int         addUrl(QUrl url);
    bool        removeUrl(int index);

    QByteArray  getData(int index);
    bool        removeData(int index);

    int         getCurrentIndex();
    bool        clear();

signals:
    void downloadFinished(int index);

When I want to make a new download, I add the url to the DownloadQueue class and get an index to the added url. I can remove the url if I need, using the same index.

Whenever a download is finished, the class emits a signal with its index, so I should make a slot to listen for these 'announcements'. If the announced index is the one I ordered, I can get its ready data by using getData() method.

Beware that the received data resides in the memory until you remove it, even though you called getData().

Another method is for checking the current processed index, just to know if my order is taking long or going to be next...etc. And the clear method to empty all the queue.

Another twist is made to make the same queue accessible by all classes. So the class is a singleton. And an instance is made like this
//example
DownloadQueue *d = DownloadQueue::getInstance();
Thanks to Mahmoud Mamdouh for helping me with the singleton thing.

Here is the complete class:
(Download)

[DownloadQueue.h]
#ifndef DOWNLOADQUEUE_H
#define DOWNLOADQUEUE_H

#include <QNetworkAccessManager>
#include <QNetworkReply>
#include <QNetworkRequest>
#include <QObject>
#include <QTimer>
#include <QUrl>

class DownloadQueue : public QObject
{
    Q_OBJECT

public:
    static DownloadQueue* getInstance();

    int         addUrl(QUrl url);
    bool        removeUrl(int index);

    QByteArray  getData(int index);
    bool        removeData(int index);

    int         getCurrentIndex();
    bool        clear();

private:
    DownloadQueue(QObject *parent = 0);
    static DownloadQueue *_instance;
    int _index;
    QTimer _timer;
    QUrl _url;
    QList<QUrl> _urlList;
    QList<QByteArray> _dataList;
    QNetworkAccessManager _manager;

signals:
    void downloadFinished(int index);

private slots:
    void handleNetworkReply(QNetworkReply *reply);
    void downloadNext();

};

#endif // DOWNLOADQUEUE_H

[DownloadQueue.cpp]
#include "downloadqueue.h"

DownloadQueue * DownloadQueue::_instance = 0;

DownloadQueue* DownloadQueue::getInstance()
{
    if(_instance == 0) _instance = new DownloadQueue();
    return _instance;
}

DownloadQueue::DownloadQueue(QObject *parent):
        QObject(parent)
{
    _urlList.clear();
    _dataList.clear();
    connect(&_manager, SIGNAL(finished(QNetworkReply*)), this, SLOT(handleNetworkReply(QNetworkReply*)));

    _index = 0;

    connect(&_timer, SIGNAL(timeout()), this, SLOT(downloadNext()));
    _timer.setInterval(500);
    _timer.start();
}

int DownloadQueue::addUrl(QUrl url)
{
    _urlList << url;
    QByteArray data;
    _dataList << data;
    return _urlList.length()-1;
}

bool DownloadQueue::removeUrl(int index)
{
    if((index < _urlList.length()) || (index != _index))
    {
        _urlList.replace(index, QUrl(""));
        return true;
    }

    return false;
}

QByteArray DownloadQueue::getData(int index)
{
    QByteArray data;
    if(index < _dataList.length())
        data = _dataList.at(index);

    return data;
}

bool DownloadQueue::removeData(int index)
{
    if(index < _dataList.length())
    {
        QByteArray data;
        _dataList.replace(index, data);
        return true;
    }

    return false;
}

int DownloadQueue::getCurrentIndex()
{
    return _index;
}

bool DownloadQueue::clear()
{
    _timer.stop();
    _urlList.clear();
    _dataList.clear();
    return true;
}

void DownloadQueue::handleNetworkReply(QNetworkReply *reply)
{
    QByteArray data = reply->readAll();
    _dataList.replace(_index, data);

    emit downloadFinished(_index);
    _index++;
    _timer.start();
}

void DownloadQueue::downloadNext()
{
    if(_index < _urlList.length())
    {
        _timer.stop();
        _manager.get(QNetworkRequest(_urlList.at(_index)));
    }
}

Here is a dummy example to show the basic use of the class.(click me)


Creative Commons License
Blog Example by Mahmoud Adly Ezzat is licensed under a Creative Commons Attribution-ShareAlike 3.0 Unported License.

Friday, November 26, 2010

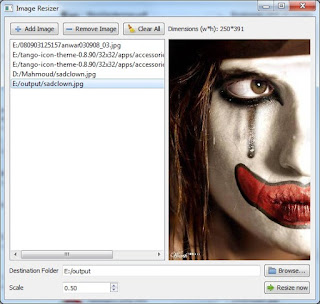
Image Resizer Example [Qt]

I've been making a small example to resize images, then did not want to just archive it, so I thought about sharing it.
  • Images to resize are added to the list through the above buttons or drag/drop.
  • A preview of the selected image appears along with width and height (in pixels).
  • One scale is set to resize all the images.
  • Icons used in the example are all free: http://tango.freedesktop.org/
  • The complete example is here: [Qt code] - [Executable]


Please tell me if you find a bug, or edit it.


Creative Commons License
Blog Example by Mahmoud Adly Ezzat is licensed under a Creative Commons Attribution-ShareAlike 3.0 Unported License.

Saturday, November 13, 2010

Setting up Environment for AIR-Android Development

This entry will be for ONLY setting up the environment of Adobe AIR development on an Android virtual device, without any programming.

To do this, we will have to do some heavy download:
1- Android SDK [android-sdk_r07-windows.zip]
2- Adobe Flash CS5
3- Adobe Flash Professional CS5 Extension for Adobe AIR 2.5 [flashpro_extensionforair_p1_102510.zxp]
4- Adobe AIR SDK [AdobeAIRSDK.zip]

After downloading all these stuff, lets install:
1- Adobe Flash Professional CS5

2- Adobe Flash Professional CS5 Extension for Adobe AIR 2.5
  • Beware, if you are using Windows Vista or Windows 7, the installation will fail because you need some administrator privileges.
  • So you'll have to go to the 'exe' file of Adobe Extension Manager CS5 [for example, C:\Program Files\Adobe\Adobe Extension Manager CS5] and right click on 'Adobe Extension Manager CS5.exe' and choose 'Run as administrator'. When it opens, choose File -> Install Extension and browse to flashpro_extensionforair_p1_102510.zxp

This is the Flash side. Now the Android SDK side:

3- Prepare the Android SDK
  • Extract "android-sdk_r07-windows.zip"
  • Open "SDK Manager.exe".
  • It will fetch some data from the internet and preview the available packages.
  • Install "SDK Platform Android" of the version you want [1.5, 1.6, 2.0, ...]
  • It will download packages from the internet.
  • Now from the left panel, choose "Virtual Devices" and create a new one, then start it and wait until it finished loading.

4- Install AIR Runtime to the virtual device
  • Extract "AdobeAIRSDK.zip".
  • Now we want to install "AdobeAIRSDK\runtimes\air\android\emulator\Runtime.apk" to the virtual device we've just created.
  • Open the windows command line [from Start menu write "cmd" then press enter].
  • Browse the terminal to the Folder of "android-sdk-windows\tools"
  • Write "adb install " and write the path of AdobeAIRSDK\runtimes\air\android\emulator\Runtime.apk. example: "adb install c:\AdobeAIRSDK\runtimes\air\android\emulator\Runtime.apk"
  • It should start to write a couple of lines and then prompt that the installation is finished.

By now, you are ready to make AIR applications from Adobe Flash and run/debug the applications on the virtual device.


References:

[Qt] Kinetic Scrolling: Ariya's Example Arabic Wrapper

I've been looking for a way to implement kinetic scrolling. And I found it here , it was a great example for kinetic scrolling but neither commented nor ready to use in other projects.


So, I worked on it, put comments on some important lines of code, added some options, and wrapped it in an easy-to-use class.

This class can be used in the design like any widget you may have used; like QListWidget for example.

Here are the features of this class:
- Right alignment and Arabic text support.
- Icon/Iconless view.
- The choice of background/selection colors.
- Emits a signal if an item is selected twice (better than double clicking).


Here are the emportant methods and signals you'll need

[FlickableList]
public:
    FlickableList(bool withIcons = false, QWidget *parent = 0);

    void addItem(QString itemString);
    void addItem(QString itemString, QPixmap icon);

    void setBackgroundColor(QColor backgroundColor);
    void setSelectedItemColor(QColor selectedItemColor);

signals:
    void itemSelected(int row);

I uploaded an example with the class. It is a very basic example that shows some lines of "أوبونتو" and a message appears if an item is selected twice indicating the row number. I tested it on Desktop/Simulator/S60 Device.


All you need to use this class is the folder called "FlickableList".
(Download Full Example & Class)


References:
Qt Labs - Kinetic scrolling on any widgets [Posted by Ariya Hidayat]


Creative Commons License
Blog Example by Mahmoud Adly Ezzat is licensed under a Creative Commons Attribution-ShareAlike 3.0 Unported License.

Friday, November 12, 2010

Passing Parameters to a QMetaObject in Qt

The target scenario is as follows:
- Window(A) calls Window(B) and then Window(A) is closed.
- When Window(B) is closed we want to go back to Window(A). But Window(A) needs some parameters in the constructor. How to know these parameters, an the exact values?

One solution is to pass the previously known parameters from (A) to (B), then when (B) is destroyed, it will create an instance from (A) with these parameters. But this is not generic, because if (B) is called in an application by two different windows, how do we know which Window(A or C) called it?
To make the process more generic, here is a solution:

In Window(A): make a 'struct' containing all the parameters needed by the constructor.

Make a new constructor for class (A) that takes a void pointer (void* myPointer) and has a macro Q_INVOKABLE before it.

ex:
WindowA(int number, QString text);
Q_INVOKABLE WindowA(void* params);

In the original constructor, save the parameters in the struct you made

ex:
c_params->number = number;
c_params->text = text;

And when calling Window(B) you pass the "staticMetaObject" of the current class and the struct instance as a void pointer.

ex:
WindowB* b1 = 
    new WindowB(WindowA::staticMetaObject, (void*)c_params);

Note: the WindowA must have a Q_OBJECT macro it its definition.

ex:
class WindowA : public QMainWindow
{
    Q_OBJECT

public:
    WindowA(int number, QString text, QWidget *parent = 0);
    Q_INVOKABLE WindowA(void* params, QWidget *parent = 0);
    ~WindowA();
private:
    Ui::WindowA *ui;
    ClassParam *c_params;
private slots:
    void on_pushButton_clicked();
};

and of course the constructor of WindowB may look like this (and can have any extra needed parameters):
WindowB(QMetaObject metaobject, void* params);

We save these parameters in some local variables to be used later.

ex:
private:
    QMetaObject parentForm;
    void* c_params;

And whenever we want to call ClassA, we do as follows:
QMainWindow* w = 
    (QMainWindow*)(parentForm.newInstance(Q_ARG(void*, c_params)));

Here I casted the parent form instance as a QMainWindow because it inherits from it.
Note that the parameters passed in the newInstance() method are passed in a void pointer. And to do this, I used the macro Q_ARG(void*, c_params) which takes the type of the parameter (void*) and the data (c_params).

Now we move back to WindowA to see how it works.
This time the invokable constructor is the one to be called:
Q_INVOKABLE ClassA(void* params);

inside this constructor I cast the void pointer as struct pointer, and then I can read its data and do whatever I want.

ex:
c_params = (ClassParam*)params;
int i = c_params->number;
QString s = c_params->text;


A simple example is attached, and has some comments for a clearer understanding.
(Download)


Creative Commons License
Blog Example by Mahmoud Adly Ezzat is licensed under a Creative Commons Attribution-ShareAlike 3.0 Unported License.

Thursday, October 7, 2010

Software Development with Qt and the Nokia Qt SDK

This is a very good presentation for Qt and Nokia Qt SDK. It is not mine but I found it very useful. Throughout this presentation you can learn much from the basics to more advanced topics. By the end of this presentation, I guess you can make a better overview and know what to learn.


Monday, October 4, 2010

Remote Device Access for Nokia Mobiles

I've been using the simulator for while and discovered that sometimes it is a disaster to use it, especially when the I make an application that needs some features not supported by the simulator. So I moved to testing on my device. But the continuous testing on my device is hurting my device as well as my heart.

So I was told about this amazing (and still free for Forum.Nokia members) website where I can test my application on real devices (yes, real devices, not simulators). This gives my a big variety of mobile phones to test my application on, and no need to stick to the simulator conditions. I also can keep my device safe since these devices are dedicated to testing. :)

What can be tested:
  • Symbian, Java and Flash lite applications
  • Python, Open C - if the required plugin is installed first
  • Different types of content, for example themes
  • Web technologies, for example Widgets and other types of web applications/pages 

Here is the page (click me) and here is a quick tour across the process.

First, you have to register at forum.nokia.com to gain free access. Then you can access the "Remote Device Access" link.
Once the page opens, you'll find a big variety of Nokia phones to use.


On the upper right corner there is a filter for devices by different parameters such as: language, OS version, Flash Lite support, screen resolution....


Move your mouse over any device to show the reservation time you want: starting from 15min and up to 3h (sometimes more). You may also a later reservation which will open a timeline to choose your preferred time (will come to it later)

After choosing the period and pressing "Start", you'll have to download a small java file.

Open it and a security window will show up. Confirm and proceed.

Now, a window will open and you'll see the device you've just chosen.
If it is a touchscreen device, you can use it directly by clicking on the screen, otherwise you'll have to use the keyboard on the screen. Move your mouse over any button to see its shortcut (ex: left softkey is F1, and the right is F2).  On the bottom left of the screen, there is an icon for your device. You can click it to open a page with all the specs of this device.

Let's take a look at the tool bar


Manage Files:

It allows you to move data between your local drive and the device memory.


View Debug Log Console:

If your program writes any data to the console a log file [thanks mamdouh.al.shamy] during execution, this is the place to find it.
To start tracing a file, enter the file path in the upper part of the window and press enter.


Install Software:

Browse your local drive for any installable files to install on the device.


Capture Still Image:

Takes a screenshot from the device screen (only the screen) and saves it to your Work Folder (My Documents in my case, can be changed).


Record:

Captures the activity of the device into a video and saves it to Work Folder. I noticed that the speed of these activities in the video is much faster than what really happened.


Browse Work Folder:

Opens the Work Folder which is My Documents by default.


Enter Full Screen:

Views the window in a full screen mode.


Options:

This screenshot can explain.


Help:

Opens a web page with many helpful topics.


Picture Quality:

Changes the quality of the device's screen. I didn't notice the big difference until I moved from min(1) to max(6)


Show/Hide Toolbar:

Shows/hides the toolbar containing these icons.

[END OF OPTIONS]

The program will give you a warning once you reach the last 5 minutes, then at 3 minutes, and finally when 1 minute is left. If you don't extend your reservation (the third image below) the device will close. You may be able to reserve it one more time, but I may get reserved by someone else before you. So you'd better estimate the amount of time you may need before reservation, or extend the time once you see the message, or maybe just save your work and leave the device if you no longer need it.


If you no longer need the device, you can close the window and a message will appear asking you if you want to cancel the reservation of the remaining time. Of course if you don't need it any more, then it will be unfair to keep the reservation (wasting the resources that other people may need). But if you want to keep the reservation, device will still be yours until the time expires or you free the remaining time later.


Notice that when you reserve a device, it will appear in "Your Reservations". If you move your mouse over it, you'll find the remaining time, the option to extend your reservation, and an option to cancel the reservation.


If you want to make a later reservation, you'll be redirected to a table showing all current/later reservations for all devices. Your reservation is the one in green and the others in red. If you click any free time slot for any device you'll be asked for confirmation.
This table also appears when you cancel a reservation.


That's it for this entry. I hope I could help. And I want to say that this service is really helpful and you should try it.

Thursday, September 9, 2010

Pushups Counter using Adobe Flash Lite (Part 1)

[stopped for a while()]

A friend of mine was talking about an iPhone app for counting pushups and how it was a success. At the same time I was introduced to the new world (it was new for me) of Adobe Flash Lite. So I thought about testing this Adobe thing and putting this app as a goal to apply what I learn.

I started to think about ways to sense the pushups:
  • Altitude: too complex for a small app.
  • Accelerometer: counting the pushups depending on changing the orientation of the device. Whether to put it on your back (stupid) or on the arm.
And I found some ideas on the web:
  • Touching the screen with your nose (believe me, it's a real app).
  • Using the iPhone proximity sensor to detect your chest.

Here are some videos:


So, my desired app will be using the accelerometer. What about my sources to learn Adobe Flash Lite?
.... Plus any video or website that can help.

I found a video on Vimeo that demonstrates accessing the accelerometer. I guess it can help.


Platform Services and the Accelerometer from Adobe Flash Lite on Vimeo.

So, here I go.

Tuesday, August 31, 2010

File-based Logging in Qt

[This entry is a refinement of an article I found here]

Testing applications for mobiles or embedded systems is very hard most of the time because I'm not always able to debug the application on the device. One solution was to write some debugging lines inside the program, and when the program passes each of these lines, the line will be written to a text file. Then I can simply open the text file and see how the application went or where it stopped.

Here it how it goes:

- Before the main(), I write:

using namespace std;
ofstream logfile;

void SimpleLoggingHandler(QtMsgType type, const char *msg)
{
    switch (type) {
        case QtDebugMsg:
            logfile << QTime::currentTime().toString().toAscii().data() << " Debug: " << msg << "\n";
            break;
        case QtCriticalMsg:
            logfile << QTime::currentTime().toString().toAscii().data() << " Critical: " << msg << "\n";
            break;
        case QtWarningMsg:
            logfile << QTime::currentTime().toString().toAscii().data() << " Warning: " << msg << "\n";
            break;
        case QtFatalMsg:
            logfile << QTime::currentTime().toString().toAscii().data() <<  " Fatal: " << msg << "\n";
            abort();
        }
    }

where each line of
logfile << QTime::currentTime().toString().toAscii().data() << " Debug: " << msg << "\n";
represents the format before each message I write. In this example I write the time, then the type of message, then the message.


- Then inside the main():
logfile.open("E:/myFile.txt", ios::app);
qInstallMsgHandler(SimpleLoggingHandler);


- Now at any class, if I want to write a message, I will just include:
#include <QDebug>

and write the line I want. For example:
qDebug()<< "[XmlClass] Receiving xml data from httpclient";
[I added class name between square brackets to know the class I am in]

Friday, August 20, 2010

Mobile Softkeys in Qt

[Nokia Qt SDK v1.0 - 23 June 2010 ]

When programming for Symbian, it is essential to make use of the available buttons. Here is how to assign the left and right buttons.

//Left Button
QAction *okSoftKeyAction = new QAction(QString("Ok"), this);
okSoftKeyAction->setSoftKeyRole(QAction::PositiveSoftKey);
connect(okSoftKeyAction, SIGNAL(triggered()), this, SLOT(mySlot1()));
addAction(okSoftKeyAction);

//Right Button
QAction *cancelSoftKeyAction = new QAction(QString("Cancel"), this);
cancelSoftKeyAction->setSoftKeyRole(QAction::NegativeSoftKey);
connect(cancelSoftKeyAction, SIGNAL(triggered()), this, SLOT(mySlot2()));
addAction(cancelSoftKeyAction);

where the left button is the PositiveSoftKey and the right button is the NegativeSoftKey. And mySlot1() and mySlot2() are any slots I make or use.

Notes:
  • When trying this on the emulator of Nokia Qt SDK v1.0, I still see the original 'Options' and 'Exit' buttons. They are fake. When I tried it on my mobile (Nokia 5530) I could see the effects for real.
  • There are many articles in Nokia Forum and many other forums talking about softkeys but their code just doesn't compile. This is because the new Qt 4.7 is different. Here is their code:
[the setSoftkeys() method no longer exists in QWidget]
/* Create ok left softkey */
QAction* ok = new QAction(tr("OK"), this);
/* Let's make it ok softkey */
ok->setSoftKeyRole(QAction::OkSoftKey);
/* Connect action to dialogs accept slot,
* which will then emit accepted signal. */
connect(ok, SIGNAL(triggered()), this, SLOT(accept()));
 
/* Create cancel right softkey */
QAction* cancel = new QAction(tr("Cancel"), this);
/* Let's make it cancel softkey */
cancel->setSoftKeyRole(QAction::CancelSoftKey);
/* Connect action to dialogs reject slot,
* which will then emit rejected signal. */
connect(cancel, SIGNAL(triggered()), this, SLOT(reject()));
 
/* Set softkeys */
QList<QAction*> mySoftKeys;
mySoftKeys.append(ok);
mySoftKeys.append(cancel);
widget->setSoftKeys(mySoftKeys);

[special thanks to TamsS60]

Friday, August 6, 2010

Prayer Times Calculations: Pure C++ Code

[25-March-2017] Update: For brothers and sisters in Indonesia or any country below the equator, thanks to Reza's comment,  the code now works correctly.
[18-January-2012 Update: I refined the code to make it easier and more elegant to use]
[06-July-2011 Update: I found this page http://praytimes.org/calculation#Implementation ]

This idea came to me when a friend of mine was asking for an 'offline database' for prayer times. I searched for algorithms to make my own database and almost all search results lead to the same algorithm. And all codes are divided into two categories: a simple but approximate one, and a complicated but precise one. I tried with the complicated one to understand it but it needs more time because of its nested functions and -unfortunately- it is not a priority right now. So I went with the easy one as a start.

One thing I noticed is that every person is trying to make the ultimate use of the framework he is working on (mostly dotNet). But come on, it is all about calculations. Why don't you make a code that can be easily converted from one language/platform to another? That's why I wanted to make that code. It has a major problem till now as it produces times later than my Egyptian calendar up to 5 minutes !!! Only later not earlier.


Anyways, here is the code, and I hope I can reach better results in the near future (in-sha'a Allah).


 The parameters needed are:
  • Year/Month/Day of the desired day.
  • Longitude/Latitude/Time Zone of the desired place.
  • Fajr Twilight/ Esha Twilight which differ in calculations from one country to another.


Organization
Angle of the sun under the Horizon (Fajr)
Angle of the sun under the Horizon (Isha)
Region
University Of Islamic Sciences, Karachi
18 Degrees
18 Degrees
Pakistan, Bangladesh,
India, Afghanistan, Parts of Europe
North America
15 Degrees
15 Degrees
Parts of the USA, Canada, Parts of the UK
Muslim World League
18 Degrees
17 Degrees
Europe, The Far East, Parts of the USA
Umm Al-Qura Committee
19 Degrees
90 minutes after the Sunset Prayer
120 minutes (in Ramadan only)
The Arabian Peninsula
Egyptian General Authority of Survey
19.5 Degrees
17.5 Degrees
Africa, Syria, Iraq, Lebanon, Malaysia, Parts of the USA


The only library used in this function was
#include <math.h>
to use the trigonometric functions (sin, cos,...)


The function takes the data of Year/Month/Day/Longitude/Latitude/TimeZone/FajrTwilight/IshaTwilight plus 6 references to double variables (Fajr/SunRise/Zuhr/Asr/Maghrib/Isha). These 6 variables are the ones to return data into. I also added some supporting functions to help in some number conversions (for example, Radians to Degrees and vise versa).

//convert Degree to Radian
double degToRad(double degree)
{
    return ((3.1415926 / 180) * degree);
}

//convert Radian to Degree
double radToDeg(double radian)
{
    return (radian * (180/3.1415926));
}

//make sure a value is between 0 and 360
double moreLess360(double value)
{
    while(value > 360 || value < 0)
    {
        if(value > 360)
            value -= 360;

        else if (value <0)
            value += 360;
    }

    return value;
}

//make sure a value is between 0 and 24
double moreLess24(double value)
{
    while(value > 24 || value < 0)
    {
        if(value > 24)
            value -= 24;

        else if (value <0)
            value += 24;
    }

    return value;
}

//convert the double number to Hours and Minutes
void doubleToHrMin(double number, int &hours, int &minutes)
{
    hours = floor(moreLess24(number));
    minutes = floor(moreLess24(number - hours) * 60);
}

void calcPrayerTimes(int year, int month, int day,
                     double longitude, double latitude, int timeZone,
                     double fajrTwilight, double ishaTwilight,
                     double &fajrTime, double &sunRiseTime, double &zuhrTime,
                     double &asrTime, double &maghribTime, double &ishaTime)
{
    double D = (367 * year) - ((year + (int)((month + 9) / 12)) * 7 / 4) + (((int)(275 * month / 9)) + day - 730531.5);

    double L = 280.461 + 0.9856474 * D;
    L = moreLess360(L);

    double M = 357.528 + (0.9856003) * D;
    M = moreLess360(M);

    double Lambda = L + 1.915 * sin(degToRad(M)) + 0.02 * sin(degToRad(2 * M));
    Lambda = moreLess360(Lambda);

    double Obliquity = 23.439 - 0.0000004 * D;
    double Alpha = radToDeg(atan((cos(degToRad(Obliquity)) * tan(degToRad(Lambda)))));
    Alpha = moreLess360(Alpha);

    Alpha = Alpha - (360 * (int)(Alpha / 360));
    Alpha = Alpha + 90 * (floor(Lambda / 90) - floor(Alpha / 90));

    double ST = 100.46 + 0.985647352 * D;
    double Dec = radToDeg(asin(sin(degToRad(Obliquity)) * sin(degToRad(Lambda))));
    double Durinal_Arc = radToDeg(acos((sin(degToRad(-0.8333)) - sin(degToRad(Dec)) * sin(degToRad(latitude))) / (cos(degToRad(Dec)) * cos(degToRad(latitude)))));

    double Noon = Alpha - ST;
    Noon = moreLess360(Noon);


    double UT_Noon = Noon - longitude;


    ////////////////////////////////////////////
    // Calculating Prayer Times Arcs & Times //
    //////////////////////////////////////////

    // 2) Zuhr Time [Local noon]
    zuhrTime = UT_Noon / 15 + timeZone;

    // Asr Hanafi
    //double Asr_Alt =radToDeg(atan(2 + tan(degToRad(abs(latitude - Dec)))));

    // Asr Shafii
    double Asr_Alt = radToDeg(atan(1 + tan(degToRad(abs(latitude - Dec)))));
    double Asr_Arc = radToDeg(acos((sin(degToRad(90 - Asr_Alt)) - sin(degToRad(Dec)) * sin(degToRad(latitude))) / (cos(degToRad(Dec)) * cos(degToRad(latitude)))));
    Asr_Arc = Asr_Arc / 15;
    // 3) Asr Time
    asrTime = zuhrTime + Asr_Arc;

    // 1) Shorouq Time
    sunRiseTime = zuhrTime - (Durinal_Arc / 15);

    // 4) Maghrib Time
    maghribTime = zuhrTime + (Durinal_Arc / 15);


    double Esha_Arc = radToDeg(acos((sin(degToRad(ishaTwilight)) - sin(degToRad(Dec)) * sin(degToRad(latitude))) / (cos(degToRad(Dec)) * cos(degToRad(latitude)))));
    // 5) Isha Time
    ishaTime = zuhrTime + (Esha_Arc / 15);

    // 0) Fajr Time
    double Fajr_Arc = radToDeg(acos((sin(degToRad(fajrTwilight)) - sin(degToRad(Dec)) * sin(degToRad(latitude))) / (cos(degToRad(Dec)) * cos(degToRad(latitude)))));
    fajrTime = zuhrTime - (Fajr_Arc / 15);

    return;
}


So, if I take Cairo as an example:
  • Date: 18-1-2012
  • Longitude: 30.2
  • Latitude: 30
  • Time Zone: +2 
  • Fajr Twilight: -19.5
  • Esha Twilight: -17.5
the function will be used like this:
double fajr, sunRise, zuhr, asr, maghrib, isha;
calcPrayerTimes(2012,1,18, 30.2, 30, 2, -19.5, -17.5, fajr, sunRise, zuhr, asr, maghrib, isha);

Note that these prayer times are still "double" and should be converted to a time format. I made the doubleToHrMin function (you can find it before the calcPrayerTimes fnction) which splits the number into Hours and Minutes. It takes the double and two references to int variables. Here is how to use it:

int hours, minutes;
doubleToHrMin(fajr, hours, minutes);

Now you have the prayer time as Hour/Minute to use it however you want.

So, in brief:
- I first add the above code block to my code, then use it whenever I want like this example:

double fajr, sunRise, zuhr, asr, maghrib, isha;
calcPrayerTimes(2012,1,18, 30.2, 30, 2, -19.5, -17.5,
                fajr, sunRise, zuhr, asr, maghrib, isha);

int hours, minutes;

doubleToHrMin(fajr, hours, minutes);
std::cout << "Fajr: " << hours << ":" << minutes << std::endl;

doubleToHrMin(sunRise, hours, minutes);
std::cout << "Sunrise: " << hours << ":" << minutes << std::endl;

doubleToHrMin(zuhr, hours, minutes);
std::cout << "Zuhr: " << hours << ":" << minutes << std::endl;

doubleToHrMin(asr, hours, minutes);
std::cout << "Asr: " << hours << ":" << minutes << std::endl;

doubleToHrMin(maghrib, hours, minutes);
std::cout << "Maghrib: " << hours << ":" << minutes << std::endl;

doubleToHrMin(isha, hours, minutes);
std::cout << "Isha: " << hours << ":" << minutes << std::endl;


(view the full prayer times example in this online IDE)

I hope it is useful to someone looking for the pure algorithm with no framework dependencies, and I hope I come back to it one more time to see the problem of these extra resulting minutes.


Resources:

جمعية الفلك بالقطيف
Muslim Programmers & Designers Community
Tanzil.info (1),(2)
PrayTime.info
IslamCity.com
IslamWare.com

Saturday, July 24, 2010

SQLite: 3.Qt and SQLite

I mentioned before that SQLite is a C library. To use this library in C++ applications, you can use many wrappers. But since I'm going in the direction of Qt, I want to use the QtSql module. QtSql module uses some drivers to communicate with databases like SQLite, MySQL, Oracle ...


Or add
//in the *.pro file
QT += sql
and include
//in any class
#include <QtSql>


The process is very easy: Create a database object. Open it. Then execute some queries.

For this entry, I created a project to explain the basic features of QtSql. I will try to explain some parts of it, and you can download it and try to understand the complete code.


Viewing Table Contents:

To view table contents, you need a QSqlTableModel object. QSqlTableModel is a high-level interface for reading and writing database records from a single table.

A simple way to use it is like this:
After creating a database object, I create a QSqlTableModel object and connect it to my database. Then I name the table I want this object to represent.
QSqlDatabase *database = new QSqlDatabase();


//set database driver to QSQLITE
*database = QSqlDatabase::addDatabase("QSQLITE");


database->setDatabaseName("./phonebook.db");

QSqlTableModel *all_model = new QSqlTableModel(this, *database);


all_model->setTable("Contacts");

all_model->select();


Then I can use this model to preview the contents of this table in some 'item views' available in the GUI designers (List View, Tree View, Table View, Column View)

ui->contacts_tableView->setModel(all_model);

QSqlTableModel has some other methods like: sorting, filtering, editing a record...etc. For example, searching a database and viewing results can be implemented by filtering the current model:

//search database for a certain name
search_model->setFilter("Name = \'"+ui->search_lineEdit->text()+"\'");


Queries:

QSqlQuery is a class that provides a means of executing and manipulating SQL statements. Its simplest statement looks like this:
QSqlQuery query("delete from Contacts where Mobile = 1234");
query.exec();

The exec() method returns 'true' if query is successful, and 'false' if it fails.

To make a query containing some variables, you can do this:

QSqlQuery query ("insert into Contacts (Name, Mobile, City) values (:name, :mobile, :city)");
    query.bindValue(0, ui->add_name_lineEdit->text());
    query.bindValue(1, ui->add_mobile_lineEdit->text());
    query.bindValue(2, ui->add_city_lineEdit->text());

    if(!query.exec())
    {
        QMessageBox::warning(0,"Error", "Please check your entered data.");
        return;
    }

where 0, 1, and 2 are the positions of the variables :name, :mobile, and :city. You can also replace the positions by the variable names:

    query.bindValue(":name", ui->add_name_lineEdit->text());
    query.bindValue(":mobile", ui->add_mobile_lineEdit->text());
    query.bindValue(":address", ui->add_city_lineEdit->text();

Note: sometimes i needed to change the query depending on a certain condition. One way to do this is using the prepare() method:

    QSqlQuery query;

    if(ui->remove_name_radioButton->isChecked())
    {
         query.prepare("delete from Contacts where Name = \'" + ui->remove_lineEdit->text()+"\'");
    }
    else
    {
        query.prepare("delete from Contacts where Mobile = \'" + ui->remove_lineEdit->text()+"\'");
    }

    if(!query.exec())
    {
        QMessageBox::warning(0,"Error", "Please check your entered data.");
        return;
    }


The Complete Example:

Now, here is the complete example for Qt with SQLite. It is a phonebook application that views all the contacts (using QSqlTableModel and a Table View), searches for a specific contact (using the filter() method of QSqlTableModel), and adds or removes a contact (using the queries).

Test it and read the code carefully. You can ask me anything you want.


Download


Creative Commons License
Blog Example by Mahmoud Adly Ezzat is licensed under a Creative Commons Attribution-ShareAlike 3.0 Unported License.

Monday, July 12, 2010

SQLite: 2.Administration Tool


After making some operations on a SQLite database using terminal, it would be better to have an easier and a more convenient tool. I wanted a free and easy-to-use program and i found Lita.


Lita is a free SQLite database administration tool for Windows, MacOSX and Linux. Using Lita, you can:
  • Open, create, compact, manage SQLite databases
  • Create, rename, delete, and empty tables
  • Create, rename and delete columns
  • Create, modify and delete records
  • Encrypt or re-encrypt your databases
  • Run, import and export your custom SQL statements
  • Create and delete indices

Once I opened this program, I didn't need any tutorial to start using it. You should try it yourself.