So, I've been in Germany for a while. And after using the fast WiFi in hotels, I moved to a personal apartment, with no Internet for now. I bought a PENNY USB surf stick as I thought it is a bit cheaper. But there was a problem, it is not working on Linux :(.

I lived with this fact for a while, but now I want to get back to programming. So, after some searching and trying, here is how I could use my PENNY Mobil Internet Stick, without their Internet manager of course, and that's a bit bad for calculating my overall usage.
Anyways, it is straight forward:
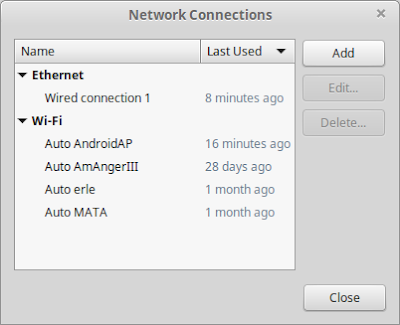
1. Open 'Network Connections'. Click 'Add'.
2. Choose 'Mobile Broadband'.

3. The default device is 'Internetstick'.

4. Choose your country. Mine is 'Germany'.

5. The service provider is 'Congstar'.

6. The default plan is 'Prepaid Contracts', which is my case.

7. Verify your data and click 'Apply'.

8. The connection form is pre-populated with the correct data. I just changed the connection name to be meaningful to me. (and the password was tm)

9. Go to 'IPv4 Settings' tab, and Add this additional DNS server IP: 193.254.160.1. Now click 'Save'.

10. The connection is added. Click 'Close'.

11. Now you can see in the connections list that a broadband section is added. Turn it on it was off. Or click the connection name you just created (Congstar Prepaid PENNY).

Now you are connected. Enjoy the surfing and keep an eye on the System Monitor for data usage :).

I lived with this fact for a while, but now I want to get back to programming. So, after some searching and trying, here is how I could use my PENNY Mobil Internet Stick, without their Internet manager of course, and that's a bit bad for calculating my overall usage.
Anyways, it is straight forward:
1. Open 'Network Connections'. Click 'Add'.

2. Choose 'Mobile Broadband'.

3. The default device is 'Internetstick'.

4. Choose your country. Mine is 'Germany'.

5. The service provider is 'Congstar'.

6. The default plan is 'Prepaid Contracts', which is my case.

7. Verify your data and click 'Apply'.

8. The connection form is pre-populated with the correct data. I just changed the connection name to be meaningful to me. (and the password was tm)

9. Go to 'IPv4 Settings' tab, and Add this additional DNS server IP: 193.254.160.1. Now click 'Save'.

10. The connection is added. Click 'Close'.

11. Now you can see in the connections list that a broadband section is added. Turn it on it was off. Or click the connection name you just created (Congstar Prepaid PENNY).

Now you are connected. Enjoy the surfing and keep an eye on the System Monitor for data usage :).