Showing posts with label Ruby. Show all posts

Wednesday, April 1, 2020

Retry ruby code with exceptions multiple times

This problem I faced is pretty simple. A method calling an external API or resource which might throw a random error or fail intermittently. So I want to simple retry because this error is ignorable if it happens one or two times.

Now the standard ruby's retry and redo keywords are not helping here. Because the retry will keep retrying endlessly and I want to raise the error after a few retries, and the redo requires a flag to make it stop. So my solution to retry my ruby code for a few times if a specific exception happens was as simple as a method with the retry logic and accepting a block to keep my code cleaner. And whenever I need to retry a not-so-reliable API, I wrap my code in this method as a block and choose the exception to retry when it happens and how many times to retry.

# whatever method I am using
def do_something_with_tolerance_to_errors
  response = with_error_retry(WhateverException, 2) do
    # my code goes here
  end
end

# my retry handler
def with_error_retry(error_class, retries_count)
  yield
rescue error_class => e
  @retries ||= 0
  raise e if @retries >= retries_count

  @retries += 1
  retry
end


Monday, November 30, 2015

CSE 321 Project - Part 2 - Install Ruby, Rails, PostgreSQL, MySQL and others

This is one post in a series of posts related to CSE 321 - Software Engineering project for ASU CSE 2017 students. The series starts from setting up the environment, to planning the work on the website project, to implementation

After Installing Lubuntu/Ubuntu in a VM in part 1, we want to prepare it for development.

Thinking about the required project, this is what I want to install.
  • Ruby
  • Rails
  • PostgresSQL (or MySQL)
  • Node.js
  • Git
  • Gitg (a graphical tool to use with Git)
  • Atom editor (or you can install Sublime if you like)
Plus enabling copy & paste between the VM and the computer, and enabling flexible display resolution to suit your taste. And I will start with this.

Install Guest Additions

Now we need to install some additional packages to add more power to our VM. This will make our job easier in scaling the VM window (and keeping the aspect ratio), and enables copy&paste between the VM and the host computer to easily follow the next instructions.

If you have a toolbar in the outer VM window, go to Devices -> Insert Guest Additions CD image.... If you cannot find the toolbar, press Right Ctrl + Home buttons and the menu should appear. (if you still fail, press Right Ctrl + C and search for the toolbar again)

Once you do this, a virtual CD will be mounted (inserted) into the machine to install some additional packages.

In case of Ubuntu, the process should start immediately once you click Run in the box that will appear.

In case of Lubuntu, you will have something like this:

Click OK. Then run autorun.sh in the window that will appear (this is the content of the virtual CD).

Then choose Execute.

Authorize the script to have additional privileges by entering your password and pressing OK.

The script will run for a few seconds, installing some packages. Once finished you will have to press Enter to exit.

Extra: In case of Lubuntu, you need to install another package. Open the terminal by pressing Ctrl + Alt + T or clicking the start menu -> System Tools -> XTerm. Then type (you cannot copy at this point):
sudo apt-get install --yes virtualbox-guest-dkms
Then enter your password when it asks for it (it will download about 60MB).


Now shutdown the machine, go to this VM Settings -> General -> Advanced tab, and set Shared Clipboard to Bidirectional. This way you can copy instructions from your host OS to the VM terminal, and copy any error message you face from the VM terminal to -for example- your browser in the host OS.

Now let's start the VM again.

This time, try to copy any text (for example, a url) from your host OS. Then search for Firefox browser in the VM and paste it. It works!

One more thing has happened. If you resize the VM window, it will scale and keeps the aspect ratio. If you find the screen is getting 'compressed' and losing the correct ratio, press Right Ctrl + C.

Now we have a clean and helpful environment to work with.
Let's start with the development installations. Open the terminal and get ready!

Install Ruby

(references used: DigitalOcean, GoRails)

First there are some packages to install before Ruby.

Update out package list
sudo apt-get update

Install git, curl, and some other packages for compilation (~90MB)
sudo apt-get install git-core curl zlib1g-dev build-essential libssl-dev libreadline-dev libyaml-dev libsqlite3-dev sqlite3 libxml2-dev libxslt1-dev libcurl4-openssl-dev python-software-properties libffi-dev

Now install rbenv (the tool for manging Ruby versions, better than installing Ruby directly)
cd
git clone git://github.com/sstephenson/rbenv.git .rbenv
echo 'export PATH="$HOME/.rbenv/bin:$PATH"' >> ~/.bashrc
echo 'eval "$(rbenv init -)"' >> ~/.bashrc
git clone git://github.com/sstephenson/ruby-build.git ~/.rbenv/plugins/ruby-build
echo 'export PATH="$HOME/.rbenv/plugins/ruby-build/bin:$PATH"' >> ~/.bashrc
source ~/.bashrc

Next, install Ruby and set the installed version to be the default. (this will take a while to download and compile)
rbenv install -v 2.2.3
rbenv global 2.2.3

Now if you type
ruby -v
you will see the default ruby version.

Let's add one more step, disable documentation installation. We do not need them.
echo "gem: --no-document" > ~/.gemrc

Install Bundler Gem

This is the first gem to install. It is responsible for handling later gems in Rails projects.
gem install bundler

Install Rails
gem install rails -v 4.2.5

When it finishes, if you type
rails -v
you will see the default rails version.

Install Node.js

(reference: https://github.com/nodesource/distributions)
Node.js is a platform for development using Javascript. Rails uses Node.js in a certain step when joining multiple Javascript files together for better performance. You may not need this at first, but let's setup the environment the right way for future use and future reference.

curl -sL https://deb.nodesource.com/setup_4.x | sudo -E bash -
sudo apt-get install -y nodejs

Now type
node -v
to check the installed version.

Install PostgreSQL

PostgreSQL is the biggest competitor to MySQL database. It is getting more popular, so it is nice to stay up-to-date and give it a try. But don't be scared. at first, it will not matter if you use MySQL or PostgreSQL because most of your interactions will be through Rails. (You can skip it and install MySQL)
sudo sh -c "echo 'deb http://apt.postgresql.org/pub/repos/apt/ precise-pgdg main' > /etc/apt/sources.list.d/pgdg.list"
wget --quiet -O - http://apt.postgresql.org/pub/repos/apt/ACCC4CF8.asc | sudo apt-key add -
sudo apt-get update
sudo apt-get install -y postgresql-common
sudo apt-get install -y postgresql-9.4 libpq-dev

Create PostgreSQL User

The last step is to create a new db user for later.
sudo -u postgres createuser cse -s
If you would like to set a password for the user, you can do the following
sudo -u postgres psql
postgres=# \password cse 
then enter the password you like.

Install MySQL

Use this command to install MySQL server and client.
sudo apt-get install mysql-server mysql-client libmysqlclient-dev
When prompted, you can choose to enter a password for the root user of MySQL or leave it blank. Whatever you choose, then use the down arrow to go to OK line and hit enter.


The root user has access to all databases. It is not safe to use it in production environment. It is better to create a new user for each project and give access to project's database only. But since this is a development environment, we can use root user.

Install Atom Editor

Now we need a nice editor to help us with developmen. Recently, I switched from Sublime Text to Atom Editor. So I will continue with using Atom. Feel free to use whatever you want.
You can install Atom by downloading the installer (*.deb) from their home page, or install it from the terminal. To avoid explaining how to share folders between VM and host, I will install it from the terminal. You can follow my steps or download the installer from the VM browser.
sudo add-apt-repository ppa:webupd8team/atom
sudo apt-get update
sudo apt-get install atom

Install Gitg


The last optional step is to install Gitg. It is a graphical interface to use Git. It make things a bit easier when it comes to committing changes, reviewing history, and other operations you may need.

sudo apt-get install gitg


That's all folks! Your machine is ready. You can compress the machine and share it with others or keep it as a backup as a ready-to-use machine.

Wednesday, May 8, 2013

Facebook Scores API with Koala Gem

Here is a code snippet for a piece of code that I found a lot of people asking about on the web. Since Koala gem does not have an explicit API for Facebook Scores API, some people wonder why it isn't there.

Actually, there is a generic call that can do the job just fine:

After getting your Koala gem to work: check this URL for more about Creating a Facebook Rails app with Koala gem.


Read the set of scores for a user and their friends

Facebook Scores API states that: "You can read the set of scores for a user and their friends for your app by issuing an HTTP GET request to /APP_ID/scores with the user access_token for that app."

So this can be done with the 'get_object()' method,
api = Koala::Facebook::API.new(session[:access_token])
scores = api.get_object(APP_ID + "/scores")


Create or update a score for a user:

Facebook Scores API states that: "You can post a score for a user by issuing an HTTP POST request to /USER_ID/scores with a user or app access_token as long as the user has granted the publish_actions permission for your app."

So this can be done with the 'put_connections()' method,
api = Koala::Facebook::API.new(session[:access_token])
user_profile = api.get_object("me")
result = api.put_connections(user_profile['id'], 'scores?score='+my_score)

if result == true
    #great!
else
    #oops!
end


Thursday, January 10, 2013

Link Preview using Rails, AJAX, and Nokogiri Gem

I was trying to make some working code to preview link content like Facebook, Google Plus, LinkedIn .. etc. And I have to say, it is not that easy to get it to perfection.


Here are some notes before starting:

  • The happy scenario is to find ready tags inside the HEAD tag of the HTML file. Some times they are there, a lot of times they are not there. In video sharing websites like Youtube or Vimeo, or other news websites who care about these details, you will find meta data to save the day. For example:

<meta property="og:url" content="http://www.youtube.com/watch?v=c6nzShZQBLQ">
<meta property="og:title" content="Kinetic Scrolling Example [Arabic] [Qt]">
<meta property="og:description" content="Visit my blog entry for more info, and the complete example: http://3adly.blogspot.com/2010/11/qt-kinetic-scrolling-ariyas-example.html Example uploaded on M...">
<meta property="og:type" content="video">
<meta property="og:image" content="https://i4.ytimg.com/vi/c6nzShZQBLQ/mqdefault.jpg">
<meta property="og:video" content="http://www.youtube.com/v/c6nzShZQBLQ?autohide=1&amp;version=3">
<meta property="og:video:type" content="application/x-shockwave-flash">
<meta property="og:video:width" content="640">
<meta property="og:video:height" content="480">
<meta property="og:site_name" content="YouTube">

  • If these data exist, your work is done. Otherwise, you will have to search inside the HTML document to get some text and images to use for the preview. This mean more calculations and algorithms.
  • A major issue is that Javascript has security issues preventing the process of fetching HTML content of another domain, so the processing on the client side is not possible, and all the parsing has to be on the server side, which means loading the server for a simple feature.
  • Another major issue is that Ruby has no built-in HTML/XML parser. So it is up to you to make your own or search for an alternative. I saved time and used Nokogiri gem to parse HTML and get the data I need.
  • Note that returning HTML data via AJAX is not preferred and can easily break the code. So you'd better return a JSON object and process it on client side. 
  • One final note is that you should take care of text encoding. For example, I prefer to make Arabic support inside my application, so the UTF-8 encoding is important to me.


So here is how the process goes:
  1. Receive pasted URL using Javascript.
  2. Send URL in an AJAX request to your server.
  3. Fetch the HTML content of the URL and parse the useful data.
  4. Send data back to HTML page as a JSON object.
  5. Process the JSON object by Javascript to preview data to user.


1- Receive pasted URL using Javascript:

Javascript does this job. I simply listen to the 'paste' event then get the text inside the textarea. Of course it would be much recommended to validate text first.

$("#post_content").bind('paste', function(e) {
    var el = $(this);
    setTimeout(function() {
        var text = $(el).val();
        // send text to server
    }, 100);
});


2- Send URL in an AJAX request to your server:

$("#post_content").bind('paste', function(e) {
    var el = $(this);

    setTimeout(function() {
        var text = $(el).val();
        
        // send url to service for parsing
        $.ajax('/url/to/server/handler', {
            type: 'POST',
            data: { url: text },
            success: function(data,textStatus,jqXHR ) {
                // handle received data
            },
            error: function() { alert("error"); }
        });
    }, 100);
});


3- Fetch the HTML content of the URL and parse the useful data:
4- Send data back to HTML page as a JSON object:

In this step I use Nokogiri gem to do the dirty work of parsing for me. First remember to add the gem to the Gemfile.
Note: In case of Linux, you may want to install libxslt-dev and libxml2-div before bundling.

gem 'nokogiri' , '~> 1.5.6'

The "param_url"  is the url received on the server side. I pass it to Nokogiri then play with the document object returned. The easiest way is to iterate on the mate tags in HEAD and get the strings I want. Here you may make more effort to parse data from the BODY if the meta tags were not helpful.

doc = Nokogiri::HTML(open(param_url), nil, 'UTF-8')
            
title = ""
description = ""
url = ""
image_url = ""

doc.xpath("//head//meta").each do |meta|
    if meta['property'] == 'og:title'
        title = meta['content']
    elsif meta['property'] == 'og:description' || meta['name'] == 'description'
        description = meta['content']
    elsif meta['property'] == 'og:url'
        url = meta['content']
    elsif meta['property'] == 'og:image'
        image_url = meta['content']
    end
end

if title == ""
    title_node = doc.at_xpath("//head//title")
    if title_node
        title = title_node.text
    elsif doc.title
        title = doc.title
    else
        title = param_url
    end
end

if description ==""
    #maybe search for content from BODY
    description = title
end

if url ==""
    url = param_url
end

render :json => {:title => title, :description => description, :url => url, :image_url => image_url} and return


5- Process the JSON object by Javascript to preview data to user:

Finally, the data is returned to the Javascript on the client side. Be creative with handling the data and viewing it to the user. Here is a single line as an example of handling data inside the 'success' handler.

$("#preview-title").text(data['title']);


Thursday, December 20, 2012

Deploying Rails Application on Windows Azure (Ubuntu VM)

In the last weeks, I've been exploring my options for hosting a Ruby on Rails application. An important step was Windows Azure. I registered for a 90-day trial to give it a try. One of the great services Microsoft has offered was the Ubuntu virtual machine ( :D ). So this tutorial can be useful even with a normal Ubuntu machine (except the Endpoints part) since I'm treating it like an Ubuntu machine regardless of the Azure service it is hosted on.

In this tutorial, I will create a new Ubuntu 12.04 LTS virtual machine, install Ruby ( 1.9.3 ) and Rails ( 3.2.9), install Passenger gem, install Apache server and connect it to Rails application. And finally, some important notes about getting your project up and running.

Create an Ubuntu 12.04 LTS VM:

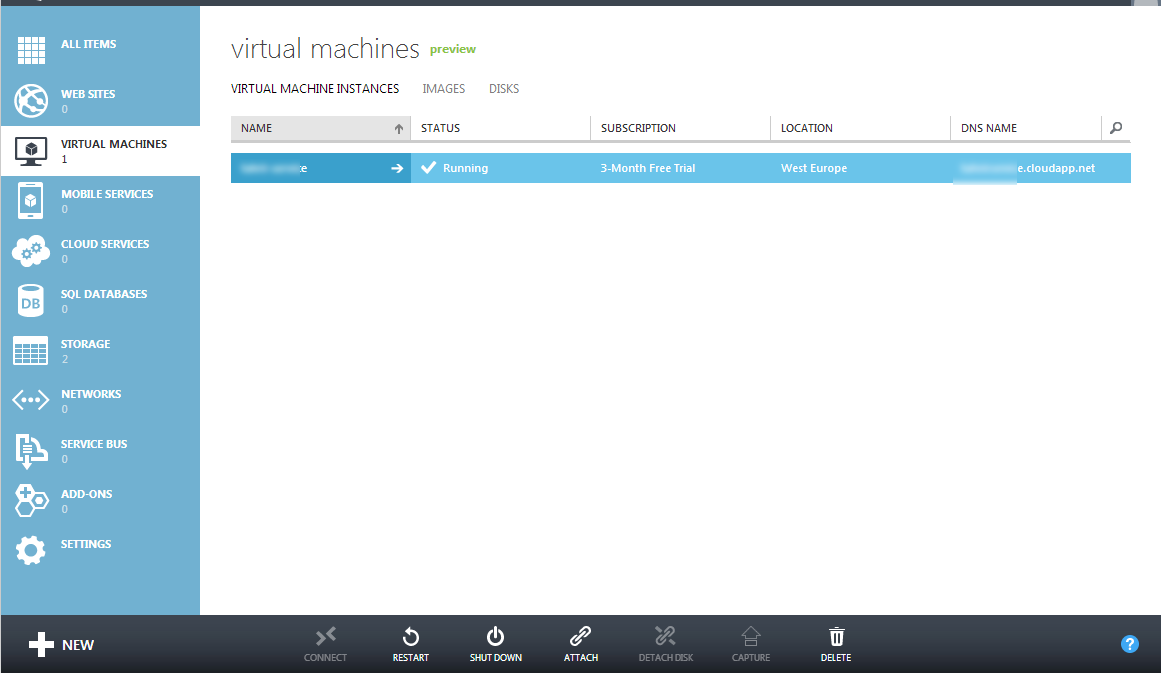
- In you portal, from the bottom right corner click: New -> Compute -> Virtual Machine -> From Gallery.

- Scroll the list to Ubuntu Server 12.04 LTS and click it.

- Fill the required data about the VM name, the username to create in that machine and password (you will need them A LOT), and number of cores running this machine (I'm on trial version, so 1 is enough to try it).

- Choose the appropriate DNS name (your service URL) and the suitable place for the service.

- You are done with the VM creation.


Create Endpoints for SSH, FTP, Apache:

- The endpoint is the way of communication between the VM and the outer world. Each endpoint takes a public port (the one you call) and a private port (the one the VM listens to).

- Click on the created VM, select the ENDPOINTS tab. You will find that the SSH endpoint is already created on port 22.

- Now create two other ports for FTP (port 21) and Apache service (default port, port 80). Names of the endpoints do not matter, but you'd better give them meaningful names.

- Do not forget to start the VM before the next step.


Access the Ubuntu Server Through SSH:

- All you interaction with the server will be though SSH via port 22. Although you can then install a GUI package and remote access the server, I choose not to do this because of the extra space and CPU cycles it takes, and common, this is Linux, you only need a terminal to have fun!

- Since I'm using windows, I use a nice SSH client: PuTTY. Just download, run, enter your server's name and click 'open', enter usrename/password in the terminal that shows up.

- Now you are on board, let's install Ruby and Rails.

Note: You can copy and paste inside PuTTY terminal as follows: highlight the terminal text with the mouse to copy it, and right click on the terminal to paste.

Install Ruby and Rails:

- Some people prefer to install Ruby using 'rbenv' or 'rvm', but I prefer simplicity. I'll just install Ruby directly.

- If you cannot 'sudo apt-get install ruby -v 1.9.3' directly, you may follow these steps:

sudo apt-get update

sudo apt-get install ruby1.9.1 ruby1.9.1-dev \
  rubygems1.9.1 irb1.9.1 ri1.9.1 rdoc1.9.1 \
  build-essential libopenssl-ruby1.9.1 libssl-dev zlib1g-dev

sudo update-alternatives --install /usr/bin/ruby ruby /usr/bin/ruby1.9.1 400 \
         --slave   /usr/share/man/man1/ruby.1.gz ruby.1.gz \
                        /usr/share/man/man1/ruby1.9.1.1.gz \
        --slave   /usr/bin/ri ri /usr/bin/ri1.9.1 \
        --slave   /usr/bin/irb irb /usr/bin/irb1.9.1 \
        --slave   /usr/bin/rdoc rdoc /usr/bin/rdoc1.9.1

# choose your interpreter
# changes symlinks for /usr/bin/ruby , /usr/bin/gem
# /usr/bin/irb, /usr/bin/ri and man (1) ruby
sudo update-alternatives --config ruby
sudo update-alternatives --config gem

# now try
ruby --version

Then install Rails
sudo gem install rails --no-rdoc --no-ri

Install Passenger and Apache:

- The passenger gem is the connection between Apache server and your rails app. We need to install Passenger, Apache, and the Passenger's Apache module.
(edit: I've been facing some issues with v3 when restarting the server, so I added --pre to install the yet-not-released v4. In case you have v4 by the time you read this, just proceed with the command as it is.)
sudo gem install passenger --no-rdoc --no-ri
sudo passenger-install-apache2-module

- The previous line will open an installation wizard to guide you though the installation of the module. It is supposed to ask you for extra packages to install. In my case, these were the packages:

sudo apt-get install libcurl4-openssl-dev apache2-mpm-prefork apache2-prefork-dev libapr1-dev libaprutil1-dev

- After installing the missing packages, run the module installation one more time.
sudo passenger-install-apache2-module

- Now the module will install and ask you to add some paths to the apache config file which is supposed to be in 'etc/apache2/apache2.conf'.

- It will also give you an example of how to add a virtual host to get your rails app running through Apache.

- To open the file from terminal, use:
sudo nano etc/apache2/apache2.conf

- Here is what I had to add to my config file:
LoadModule passenger_module /var/lib/gems/1.9.1/gems/passenger-3.0.18/ext/apache2/mod_passenger.so
PassengerRoot /var/lib/gems/1.9.1/gems/passenger-3.0.18
PassengerRuby /usr/bin/ruby1.9.1

<VirtualHost *:80>
  ServerName adly-test.cloudapp.net
  # !!! Be sure to point DocumentRoot to 'public'!
  DocumentRoot /home/adly/apps/testrails/public

  <Directory /home/adly/apps/testrails/public>
     # This relaxes Apache security settings.
     AllowOverride all
     # MultiViews must be turned off.
     Options -MultiViews
  </Directory>
</VirtualHost>


Upload Your Project Using FTP:

- Some tutorials go for using Github and some packaging tools, but I do not like that. I want to upload my files myself. So I'm using "vsftpd" for the Ubuntu Server side, and FileZilla on the my Windows side.
(You can use Git without the need to Capistrano or Unicorn gems, remember it is just a Linux machine. Git is better for continuous development.) (you can also use WinSCP client for SFTP protocol and forget about FTP client and end point)

- Install vsftpd
sudo apt-get install vsftpd

- Edit the config file:
sudo nano /etc/vsftpd.conf

- Modify the following lines:
#local_enable=YES
to
local_enable=YES

#write_enable=YES
to
write_enable=YES

anonymous_enable=YES
to
anonymous_enable=NO

- Restart the FTP server
sudo service vsftpd restart


- Now we are done with the server side. On the client side, install FileZilla and open it.

- From "Edit" -> "Settings", make sure the settings are as follows:


- From the main screen, enter your service URL, username, password, and port 21 and click "Quick Connect".

- Now you will have the server folders on the right, and your local files on the left. Move and modify however you want.


Fine tuning to get things working right (do not trust HelloWorld tutorials):

If you create a dummy project using 'rails new testrails', it will probably work fine. But those tutorials do not give the complete case of a real application, so here are some extra steps to do to avoid errors or unknown behavior.

Rails and Apache log file:

- It happens that the Rails app will write to the Apache log file, so it is better to locate a custom path to that log file instead of the default path. I prefer logging errors in a log file in the same directory of Rails log folder. So I add the following line to the VirtualHost configuration in the apache config file. I also prefer declaring the Rails working environment explicitly to avoid any human/machine errors in the future.

ErrorLog /home/adly/apps/testrails/log/error.log
RailsEnv production

so it is now like

LoadModule passenger_module /var/lib/gems/1.9.1/gems/passenger-3.0.18/ext/apache2/mod_passenger.so
PassengerRoot /var/lib/gems/1.9.1/gems/passenger-3.0.18
PassengerRuby /usr/bin/ruby1.9.1

<VirtualHost *:80>
  ServerName adly-test.cloudapp.net
  # !!! Be sure to point DocumentRoot to 'public'!
  DocumentRoot /home/adly/apps/testrails/public
  ErrorLog /home/adly/apps/testrails/log/error.log
  RailsEnv production

  <Directory /home/adly/apps/testrails/public>
     # This relaxes Apache security settings.
     AllowOverride all
     # MultiViews must be turned off.
     Options -MultiViews
  </Directory>
</VirtualHost>


Assets Compilation:

- You have to set this line to true
config.assets.compile = true
in {app_root}/config/environments/production.rb

and do not forget to compile the assets whenever changed:
rake assets:precompile
[check the "ExecJS Error, and libv8 / therubyracer version errors" section at the bottom if you have an error]

DB migration:

- If you have a database in your project, the declaration of "production" environment in the apache config file is not enough, you have to declare it explicitly when migrating:

rake db:migrate RAILS_ENV="production"


FILES PERMISSIONS:

- This is a very important step, since some files are still owned by you with zero permissions to other users.

- The quick and not-so-liberal permission is 755 for all the application folder
sudo chmod -R 755 /path/to/your/app/


- (just in case you face problems later, make this step) Double check that you give rwx privileges to the DB, assets, log and tmp folders for the user running this app whenever you add new files. For example:
sudo chmod -R 755 /path/to/your/app/app/assets
sudo chmod -R 755 /path/to/your/app/db
sudo chmod -R 755 /path/to/your/app/tmp
sudo chmod -R 755 /path/to/your/app/log

- Note: Do not forget to check the permissions of any new file you upload.


ExecJS Error, and libv8 / therubyracer version errors:

- Now this is something very common with a lot of workarounds. It is on Rails 3 because of some compatibility issues. You should get an error like "Could not find a JavaScript runtime. See https://github.com/sstephenson/execjs for a list of available runtimes.".

- To solve this problem, open your Gemfile, and add the following lines under the "group :assets do" section:

gem 'therubyracer', '0.11.0beta8', :platforms => :ruby
gem 'libv8', '~> 3.11.8.3', :platform => :ruby
then do not forget to "bundle install". No need for 'sudo', let the gems be installed locally.

[update: libv8 compilation may take several minutes if there is no matching binary for your OS version and specified version number. On another server I had to change the version to '3.11.8.3' to save time and CPU usage. Click here for more: Installing with native extensions stall ]

One final note: Do not forget to restart Apache server for the changes to take effects.
sudo service apache2 restart

Sunday, December 16, 2012

Ruby on Rails Facebook Application using Koala Gem

Here is a another Facebook application example (check the python example), but this time it is with Ruby on Rails using Koala gem. The great thing about Koala is how it is easy integrated and straight forward. Here are the steps from the very beginning:

1- Create a new Ruby on Rails project:
rails new rorApp


2- Delete ./public/index.html file as it is not needed.


3- In Gemfile add:
gem 'koala', '1.3.0'


4- In ./config/initializers folder, add a constants.rb file with the following data:
APP_ID= '123456789' # please change!
APP_SECRET= '1b2n3n5n6n7m8m9n9m0m' # please change!
SITE_URL = 'http://localhost:3000/' # please change!


Where APP_ID and APP_SECRET are the values you have from the Facebook application you create in the developers section, and the SITE_URL is the root URL of your application website ('http://localhost:3000/' if our case of testing locally)


5- In ./config/routes.rb, add the following routes:
root :to => 'home#index'

match '/index' => 'home#index'
match '/login' => 'home#login'

The first line makes calling the root of your application points to your index page.

6- In ./app/views folder, create a 'home' folder and inside it create a 'index.html.erb' with any content you want to show. It will only be available after user logs in.

7- In ./app/controller folder, create a 'home_controller.rb' file with the following content:
class HomeController < ApplicationController
            
    def index   
        if params[:code]
            # acknowledge code and get access token from FB
            session[:access_token] = session[:oauth].get_access_token(params[:code])
        end  

        # auth established, now do a graph call:
        @api = Koala::Facebook::API.new(session[:access_token])

        begin
            @user_profile = @api.get_object("me")
        rescue Exception=>ex
            puts ex.message
            #if user is not logged in and an exception is caught, redirect to the page where logging in is requested
            redirect_to '/login' and return
        end

        respond_to do |format|
         format.html {   }    
        end
    end
    
    #########################################################
    
    def login
        session[:oauth] = Koala::Facebook::OAuth.new(APP_ID, APP_SECRET, SITE_URL + '/')
        @auth_url =  session[:oauth].url_for_oauth_code(:permissions=>"read_stream publish_stream")  

        redirect_to @auth_url
    end
    
    #########################################################
end

The code explains itself, but here is a quick explanation: When the index page is called, the application looks for the access token for the current user in the cookies ('session[]'). If not found, it will redirect to the login page. The login handler will do the authentication headache for you with the extra permissions you want and passes the root URL as a call back so that Facebook will call it after authentication is done. Then when the index page is called one more time with an authentication code, it will be used to get the access token needed for any later requests.
So when the user opens the index page, he will notice some redirects and message boxes asking for allowing your application and for extra permissions then he is redirected to your index page.

8- Now you have your application ready. Just run 'bundle' from your terminal (make sure you are in the root folder of your application) to install Koala and then 'rails s' to start the web service.
bundle
rails s


9- Finally here are some Graph API calls that you may use to get profile data, friends list, post text/image and text to user's wall.
@api = Koala::Facebook::API.new(session[:access_token])
@user_profile = @api.get_object("me")
@friends = @api.get_connections(user_profile["id"], "friends")
@api.put_wall_post("hi")
@api.put_picture("http://www.example.com/image.png", {:message => "an image of mine!"})


You can learn more about Koala gem from this link: https://github.com/arsduo/koala

Thursday, November 15, 2012

A Complete Guide to Install Ruby and Rails on Windows

As usual, whenever I find a problem with something and then another problem appears with no guide except Google and my experience (if any), I make my own guide. This time it is a guide to installing Ruby then Rails on Windows.

Step 1 - Install Ruby (Ruby 1.9.3-p327 while writing this post) through RubyInstaller:


It is as easy as any other Windows Installer. Just go to RubyInstaller download page and download it. One thing to notice while installing is to check the option to add Ruby executables to your PATH, and maybe file association if you wish. Note: Make sure the installation path does not have spaces (like: Program Files) to avoid any terminal errors later.


Step 2 - Install Development Kit (DevKit-tdm-32-4.5.2-20111229-1559-sfx.exe  while writing this post):


As their page says: "The RubyInstaller Development Kit (DevKit) is a MSYS/MinGW based toolkit than enables you to build many of the native C/C++ extensions available for Ruby." It will be needed to install some 'gems' for Rails later. The executable is no more than a 7zip archive that can be extracted to a folder of choice.

After extracting the folder,
- Open the command line (cmd) as administrator (Shift+Enter or right click and 'run as administrator') and browse to the devkit  directory.
- If we step to the normal step mentioned in the RubyInstaller Development Kit Wiki we will get an error like this: " registry.rb:172:in `find': unknown > > encoding name > > - CP720 (ArgumentError) ". So first, let's write this in the command line:
chcp 1256
- Next, let's initialize the devkit:
ruby dk.rb init
-  Make sure the generated "config.yml" file includes the right Ruby version.
- Next install devkit:
ruby dk.rb install
- You can follow the RubyInstaller Development Kit Wiki instructions to make sure it is installed properly.


Step 3 - Install Some Gems for Rails:


When installing Rails later, it will require some gems to install. So let's install them now.
- From command line, write:
gem install json -v  '1.7.5'
gem install coffee-rails -v '3.2.2'
- Wait for the download and installation to end.


Step 4 - Install Rails


- From command line, write:
gem install rails
- Wait for the download and installation to end.

Step 5 - First Rails Project


- From command line, cd to the folder of your choice or write the full path in the following line:
rails new ./projects/test_proj
- Wait for file creation to end, then cd to the project file.
- Write:
rails s
and your first Ruby on Rails service will be online on "localhost:3000"

Now you have your environment ready for Ruby on Rails development.