Friday, November 26, 2010

Image Resizer Example [Qt]

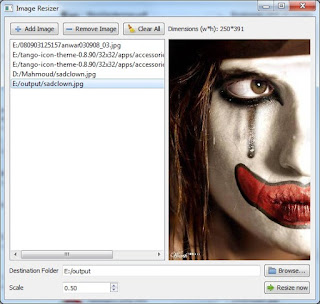
I've been making a small example to resize images, then did not want to just archive it, so I thought about sharing it.
  • Images to resize are added to the list through the above buttons or drag/drop.
  • A preview of the selected image appears along with width and height (in pixels).
  • One scale is set to resize all the images.
  • Icons used in the example are all free: http://tango.freedesktop.org/
  • The complete example is here: [Qt code] - [Executable]


Please tell me if you find a bug, or edit it.


Creative Commons License
Blog Example by Mahmoud Adly Ezzat is licensed under a Creative Commons Attribution-ShareAlike 3.0 Unported License.
Saturday, November 13, 2010

Setting up Environment for AIR-Android Development

This entry will be for ONLY setting up the environment of Adobe AIR development on an Android virtual device, without any programming.

To do this, we will have to do some heavy download:
1- Android SDK [android-sdk_r07-windows.zip]
2- Adobe Flash CS5
3- Adobe Flash Professional CS5 Extension for Adobe AIR 2.5 [flashpro_extensionforair_p1_102510.zxp]
4- Adobe AIR SDK [AdobeAIRSDK.zip]

After downloading all these stuff, lets install:
1- Adobe Flash Professional CS5

2- Adobe Flash Professional CS5 Extension for Adobe AIR 2.5
  • Beware, if you are using Windows Vista or Windows 7, the installation will fail because you need some administrator privileges.
  • So you'll have to go to the 'exe' file of Adobe Extension Manager CS5 [for example, C:\Program Files\Adobe\Adobe Extension Manager CS5] and right click on 'Adobe Extension Manager CS5.exe' and choose 'Run as administrator'. When it opens, choose File -> Install Extension and browse to flashpro_extensionforair_p1_102510.zxp

This is the Flash side. Now the Android SDK side:

3- Prepare the Android SDK
  • Extract "android-sdk_r07-windows.zip"
  • Open "SDK Manager.exe".
  • It will fetch some data from the internet and preview the available packages.
  • Install "SDK Platform Android" of the version you want [1.5, 1.6, 2.0, ...]
  • It will download packages from the internet.
  • Now from the left panel, choose "Virtual Devices" and create a new one, then start it and wait until it finished loading.

4- Install AIR Runtime to the virtual device
  • Extract "AdobeAIRSDK.zip".
  • Now we want to install "AdobeAIRSDK\runtimes\air\android\emulator\Runtime.apk" to the virtual device we've just created.
  • Open the windows command line [from Start menu write "cmd" then press enter].
  • Browse the terminal to the Folder of "android-sdk-windows\tools"
  • Write "adb install " and write the path of AdobeAIRSDK\runtimes\air\android\emulator\Runtime.apk. example: "adb install c:\AdobeAIRSDK\runtimes\air\android\emulator\Runtime.apk"
  • It should start to write a couple of lines and then prompt that the installation is finished.

By now, you are ready to make AIR applications from Adobe Flash and run/debug the applications on the virtual device.


References:

[Qt] Kinetic Scrolling: Ariya's Example Arabic Wrapper

I've been looking for a way to implement kinetic scrolling. And I found it here , it was a great example for kinetic scrolling but neither commented nor ready to use in other projects.


So, I worked on it, put comments on some important lines of code, added some options, and wrapped it in an easy-to-use class.

This class can be used in the design like any widget you may have used; like QListWidget for example.

Here are the features of this class:
- Right alignment and Arabic text support.
- Icon/Iconless view.
- The choice of background/selection colors.
- Emits a signal if an item is selected twice (better than double clicking).


Here are the emportant methods and signals you'll need

[FlickableList]
public:
    FlickableList(bool withIcons = false, QWidget *parent = 0);

    void addItem(QString itemString);
    void addItem(QString itemString, QPixmap icon);

    void setBackgroundColor(QColor backgroundColor);
    void setSelectedItemColor(QColor selectedItemColor);

signals:
    void itemSelected(int row);

I uploaded an example with the class. It is a very basic example that shows some lines of "أوبونتو" and a message appears if an item is selected twice indicating the row number. I tested it on Desktop/Simulator/S60 Device.


All you need to use this class is the folder called "FlickableList".
(Download Full Example & Class)


References:
Qt Labs - Kinetic scrolling on any widgets [Posted by Ariya Hidayat]


Creative Commons License
Blog Example by Mahmoud Adly Ezzat is licensed under a Creative Commons Attribution-ShareAlike 3.0 Unported License.

Friday, November 12, 2010

Passing Parameters to a QMetaObject in Qt

The target scenario is as follows:
- Window(A) calls Window(B) and then Window(A) is closed.
- When Window(B) is closed we want to go back to Window(A). But Window(A) needs some parameters in the constructor. How to know these parameters, an the exact values?

One solution is to pass the previously known parameters from (A) to (B), then when (B) is destroyed, it will create an instance from (A) with these parameters. But this is not generic, because if (B) is called in an application by two different windows, how do we know which Window(A or C) called it?
To make the process more generic, here is a solution:

In Window(A): make a 'struct' containing all the parameters needed by the constructor.

Make a new constructor for class (A) that takes a void pointer (void* myPointer) and has a macro Q_INVOKABLE before it.

ex:
WindowA(int number, QString text);
Q_INVOKABLE WindowA(void* params);

In the original constructor, save the parameters in the struct you made

ex:
c_params->number = number;
c_params->text = text;

And when calling Window(B) you pass the "staticMetaObject" of the current class and the struct instance as a void pointer.

ex:
WindowB* b1 = 
    new WindowB(WindowA::staticMetaObject, (void*)c_params);

Note: the WindowA must have a Q_OBJECT macro it its definition.

ex:
class WindowA : public QMainWindow
{
    Q_OBJECT

public:
    WindowA(int number, QString text, QWidget *parent = 0);
    Q_INVOKABLE WindowA(void* params, QWidget *parent = 0);
    ~WindowA();
private:
    Ui::WindowA *ui;
    ClassParam *c_params;
private slots:
    void on_pushButton_clicked();
};

and of course the constructor of WindowB may look like this (and can have any extra needed parameters):
WindowB(QMetaObject metaobject, void* params);

We save these parameters in some local variables to be used later.

ex:
private:
    QMetaObject parentForm;
    void* c_params;

And whenever we want to call ClassA, we do as follows:
QMainWindow* w = 
    (QMainWindow*)(parentForm.newInstance(Q_ARG(void*, c_params)));

Here I casted the parent form instance as a QMainWindow because it inherits from it.
Note that the parameters passed in the newInstance() method are passed in a void pointer. And to do this, I used the macro Q_ARG(void*, c_params) which takes the type of the parameter (void*) and the data (c_params).

Now we move back to WindowA to see how it works.
This time the invokable constructor is the one to be called:
Q_INVOKABLE ClassA(void* params);

inside this constructor I cast the void pointer as struct pointer, and then I can read its data and do whatever I want.

ex:
c_params = (ClassParam*)params;
int i = c_params->number;
QString s = c_params->text;


A simple example is attached, and has some comments for a clearer understanding.
(Download)


Creative Commons License
Blog Example by Mahmoud Adly Ezzat is licensed under a Creative Commons Attribution-ShareAlike 3.0 Unported License.